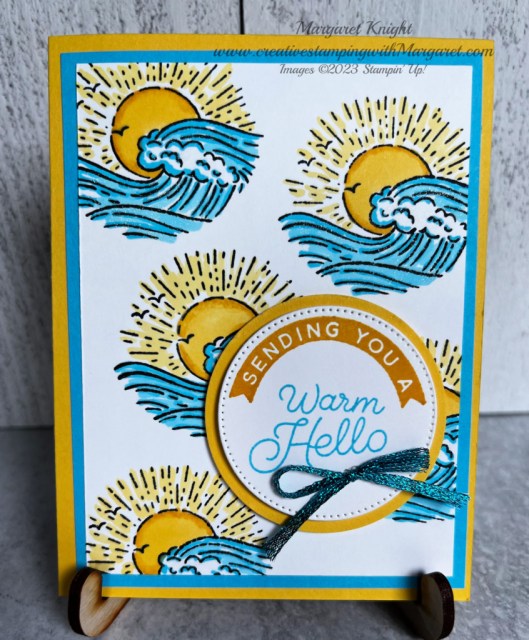
For this month’s card classes, the Circle Sayings Bundle from the Stampin’ Up! 2023-2024 Annual Catalog was featured. This Circle Sayings card offers a Warm Hello. The bundle includes the Circle Sayings Stamp Set, as well as, a coordinating 2-3/8″ Circle Punch. The stamp collection contains a variety of sayings that will fit within the circle punch. This makes it easy to cut out and create circular shapes for cards. Today’s card uses one of the stamps to create the background and a couple of other of the stamps from the set for the sentiment. A colorful card is easy to create using Stampin’ Blends to color and highlight the waves/sun image.
Cut Dimensions:
Daffodil Delight Cardstock: 5-1/2″ x 11″, score/fold at 4-1/4″ for card base, 2-3/4″ x 2-3/4″
Tahitian Tide Cardstock: 4″ x 5-1/4″
Basic White Cardstock: 3-3/4″ x 5″; 2-1/2″ x 2-1/2″
Assembly Video
The Circle Sayings Stamp Set offers a variety of sayings for different occasions. And of course, who doesn’t love a circle punch?! You’ll want to add the bundle to your stamp collections.
Don’t forget to subscribe to my blog…I have more fun projects to share plus another Circle Sayings project from the June class. Have a great week!
Margaret’s Customer Loyalty Program:
Thank you for shopping with me. Be sure to track your orders on my Customer Loyalty form.
Download the form (Customer Loyalty Form) for program details and start tracking your orders. Just a reminder: for orders over $150 you’ll also receive rewards from Stampin’ Up! You can order by clicking this link: Margaret’s Online Store. (please confirm that it says you’re shopping with Margaret Knight) Again, thank you for placing your order with me. I truly appreciate your business.
The Wild & Sweet Stamp Set in the 2022-2023 Stampin’ Up! Annual Catalog features three animal designs that are perfect for creating note cards (as well as, standard cards). Due to the detail of the animal images, coloring isn’t required. Today’s feature, the raccoon note card, is perfect for sending that simple greeting. And, isn’t this just the sweetest raccoon you’ve ever seen?
How to make this card..
Stamp the raccoon onto a piece of Basic White Thick Cardstock (4-5/8″ x 3-1/8″) using Basic Gray Classic Ink Pad. Using Balmy Blue Ink and a Water Painter, carefully apply a light wash around the image of the raccoon. Color the grass using the Garden Green Watercolor Pencil (use it dry to avoid smearing the gray ink). Stamp the “hey there” sentiment from the Charming Sentiments Stamp Set using the Basic Gray Classic Ink Pad. Next, add the stamped layer onto a piece of 4-7/8″ x 3-3/8″ Basic Gray cardstock. Finish by adding the layered panel to the front of a Note Card. For an extra touch, partially stamp the raccoon on the front edge of the note card envelope.
Often a simple note card is all you need when letting someone know you’re thinking of them. With the Wild & Sweet Stamp Set, you can quickly create a batch of simple note cards to have available when needed.
REMINDERS
When autumn rolls around, do you start thinking about cozy Christmas crafting projects? This November, Paper Pumpkin delivers this and more with its one-of-a-kind, holiday-themed crafting experience. This festive kit includes 12 fun, sparkly gift tags and (as always!) an exclusive stamp set—plus everything you need for a successful holiday crafting experience.
ABOUT THE KIT “From the North Pole”
This kit includes:
This month’s kit contains enough elements to create 12 tags—4 each of 3 designs. This all-inclusive kit includes printed die-cut paper pieces, twine, adhesive, and more!
Includes a Cherry Cobbler Classic Stampin’ Spot!
You’ll love decorating your gift tags with snowflake and banner die-cut pieces on our Mint Macaron glitter specialty paper (a Paper Pumpkin exclusive).
Create festive gift tags for all your packaging needs this holiday season with classic Christmas colors and designs.
Create fun packaging for your seasonal gifts and treats
Features a festive design in Crumb Cake
Bag size: 4″ x 6″
Time is running out ..subscribe no later than November 10, 2022 to receive the Paper Pumpkin “From the North Pole” tag kit. Click here to register.
Margaret’s Customer Loyalty Program:
Thank you for shopping with me. Be sure to track your orders on my Customer Loyalty form.
Download the form (Customer Loyalty Form) for program details and start tracking your orders. Just a reminder: for orders over $150 you’ll also receive rewards from Stampin’ Up! You can order by clicking this link: Margaret’s Online Store. (please confirm that it says you’re shopping with Margaret Knight) Again, thank you for placing your order with me. I truly appreciate your business.
Thanks for stopping by today. Happy crafting!
SHOP ONLINE: Click on any of the product photos below to shop online with me (Margaret Knight). Thank you!
Today’s product features Happy Easter Gift Tags that came about by sorting through products on the shelves in my stamp room. Have you ever wanted to make a project only to realize you did not have a stamp set with the sentiment or images for the theme? That’s exactly what happened to me when deciding to create an Easter project – no bunnies, no chicks, no Happy Easter sentiment stamps. So, it was time to get inventive and creative with products that I had available! After some searching, I was able to create a sentiment using word dies and found stamp sets that could fit the theme. Plus, scraps of cardstock were used for most of the project which is always a win-win. What do you think of the “outside the box” ideas for Easter themed gift tags?
Using the largest of the Tailor Made Tags Dies, cut the tag base from Basic White Cardstock.
Die cut the words, Happy & Easter (using the Word Wishes Dies), from Flirty Flamingo cardstock. Optional: prior to cutting the cardstock, add a piece of Adhesive Sheet to the cardstock. This makes it easy to attach to the tag.
Next, stamp one hen and two chick images onto scraps of Basic White cardstock using Tuxedo Black Memento Ink Pad.
Color the hen using the following Stampin’ Blends: body – Daffodil Delight Light & Dark, beak – Pumpkin Pie Dark, Comb & Wattle – Poppy Parade Light.
Color the chick using the following Stampin’ Blends: Body – Daffodil Delight Light, beak & legs/feet – Pumpkin Pie Light, hat – Bermuda Bay Light
Using the nest stamp from the Birds & Branches Stamp Set, stamp the nest onto a scrap of Granny Apple Green cardstock using Granny Apple Green Classic Stampin’ Pad – stamp off once before stamping onto the cardstock.
Use coordinating dies from the Birthday Chick Dies to die cut the stamped hen/chick images and the fence from a scrap of Crumb Cake cardstock.
With the Birds & More Dies, cut the stamped birds nest and and 3 eggs from a scrap of Very Vanilla Cardstock.
Use a sponge dauber to lightly apply Sahara Sand to the edges of each of the die cut eggs.
OPTIONAL: using Blending Brushes, color a sky using Coastal Cabana Classic Stampin’ Pad and color grass using Granny Apple Green Classic Stampin’ Pad.
Assembly of tags:
For the Hen/Chick tag: Add the Happy Easter to the top section of the tag leaving room for the hen. Next, attach the fence to the lower portion of the tag. Finish by adding the Hen and Chick with Stampin’ Dimensionals.
For the Chick/eggs in nest tag: Add the Happy Easter to the top section of the tag. Adhere the nest to the bottom of the tag leaving a gap at the top to insert the eggs. Then, trim the overhanging section of the nest so that sides and bottom are even with the tag. Insert the eggs into the next using Mini Glue Dots to hold in place. Complete by adding the chick with Stampin’ Dimensionals.
Note: many of the products for these tags are on the recently released Last Chance Products list (i.e. retiring products). Be sure to check out the list and order the items while they’re still available. Plus, many of the dies are on SALE!!! Products are only available while quantities last or until May 2, 2022.
And if an item is no longer available – get creative and see what you can use as a substitute!
The Savings in Bloom Promotion offers 20% savings on the Mini Stampin’ Cut & Emboss Machine and select compatible bundles. Click here to see items in the promotion.
This coastal collection includes an inspiring set of stamps and detailed dies, both early-release products from the upcoming 2022–2023 Annual Catalog. Plus, a pack of paper made from images of hand-poured paint, blue-hued foil sheets for a sea of shine, and radiant rhinestones for a splash of sparkle—each an exclusive product you can only purchase during the promotion period!
Margaret’s Customer Loyalty Program: Download the form (Customer Loyalty Form) for program details and start tracking your orders. Just a reminder: for orders over $150 you’ll also receive rewards from Stampin’ Up! You can order by clicking this link: Margaret’s Online Store. (please confirm that it says you’re shopping with Margaret Knight) Thank you for selecting to place your order with me. I truly appreciate your business.
The current host code is: YGBNKCVM (good until April 5, 2022). Please use this code if your order is $150 or less (before shipping & taxes). Remember, if your order is over $150, you will receive the host rewards.
This week, I am sharing another card from the recent All About Tulips Class. It’s a Windmill Side Panel Step card. This is a fun card to make and though it looks complicated, it’s not. The only stamping is the sentiment. The remainder of design elements include the Flowering Fields Designer Series Paper and die cuts! You’ll find all the components for the windmill in the Windmill Fields Dies. After prepping the materials, the assembly only takes a few minutes so it’s one of those projects where you can plan to make card multiples. Just cut the extra pieces and have everything ready to assemble at once. You’ll find the assembly video for the Windmill Side Panel Step Card and the project material dimensions below.
I hope you have fun creating this windmill and tulip inspired card. The Simple Suite Stampers are featuring Heart & Home Product Suite this month so in my next post, I’ll be sharing a project using the suite. Plus, I’ll have details on how you can get this month’s tutorials. Be sure to subscribe to receive my posts so you won’t miss out on the latest project ideas!
REMINDERS
The Savings in Bloom Promotion offers 20% savings on the Mini Stampin’ Cut & Emboss Machine and select compatible bundles. Click here to see items in the promotion.
This coastal collection includes an inspiring set of stamps and detailed dies, both early-release products from the upcoming 2022–2023 Annual Catalog. Plus, a pack of paper made from images of hand-poured paint, blue-hued foil sheets for a sea of shine, and radiant rhinestones for a splash of sparkle—each an exclusive product you can only purchase during the promotion period!
Margaret’s Customer Loyalty Program: Download the form (Customer Loyalty Form) for program details and start tracking your orders. Just a reminder: for orders over $150 you’ll also receive rewards from Stampin’ Up! You can order by clicking this link: Margaret’s Online Store. (please confirm that it says you’re shopping with Margaret Knight) Thank you for selecting to place your order with me. I truly appreciate your business.
Thanks for stopping by today. Happy crafting!
Project Materials:
The current host code is: YGBNKCVM (good until April 5, 2022). Please use this code if your order is $150 or less (before shipping & taxes). Remember, if your order is over $150, you will receive the host rewards.
Today’s card is a Bouquet of Love card that’s perfect to present to the one you love for a special occasion such as Valentine’s Day or an anniversary. Plus by changing the sentiment you can use it for another occasion. To create the card, the Love and Happiness Bundle is used. The bundle includes the Love & Happiness Stamp Set along with the Bouquet of Love Hybrid Embossing Folder. The stamp set contains wonderful sentiments to use for a variety of occasions. Remember hybrid embossing folders include dies so you can cut and emboss your project at the same time. The embossing folder and coordinating dies combine to create a simple but elegant card.
Card Materials:
Love & Happiness Bundle (#157642)
Crumb Cake Cardstock (#120953) card base: 5-1/2″ x 8-1/2″ score & fold at 4-1/4″; 5-1/2″ x 4-1/4″ panel for embossing
Real Red Cardstock (#102482): 3-1/4″ x 3 – 1/4″ for large heart; scraps for die cutting small flowers
Basic White Cardstock (#159276): 1″ x 3-1/2″ for sentiment; 5-1/4″ x 4″ for card interior
Granny Apple Green Cardstock (#146990) scrap to die cut leaves
Memento Tuxedo Black Ink Pad (#132708)
Rhinestone Basic Jewels (#144220)
Stampin’ Dimensionals (#104430)
Multipurpose Liquid Glue (#110755)
Mini Glue Dots (#103683)
Assembly Directions:
With die cutting machine, use the Bouquet of Love Hybrid Embossing Folder and the large heart die to emboss and cut the 5-1/2″ x 4-1/4″ panel of Crumb Cake cardstock. Add the panel to the Crumb Cake Card Base using dimensionals.
To cut and emboss the large heart, place the Real Red cardstock over the center heart in the embossing folder with the large heart die. Use adhesive to attach to the card base inserting into the heart opening of the embossed layer.
Stamp sentiment onto Basic White cardstock and cut with the coordinating die. Attach to the card overlapping the heart.
Die cut three flowers/leave sets and attach to card highlighting the sentiment.
Complete card front by embellishing the center of each flower with a small rhinestones.
REMINDERS
Three reasons to Sale-a-Brate!!! Contact me for details!
Margaret’s Customer Loyalty Program: Download the form (Customer Loyalty Form) for program details and start tracking your orders. Just a reminder: for orders over $150 you’ll also receive rewards from Stampin’ Up! You can order by clicking this link: Margaret’s Online Store. (please confirm that it says you’re shopping with Margaret Knight) Thank you for selecting to place your order with me. I truly appreciate your business.
Thanks for stopping by today. Happy crafting!
Project Materials:
The current host code is: 7AKTABVS (good until February 1, 2022). Please use this code if your order is $150 or less (before shipping & taxes). Remember, if your order is over $150, you will receive the host rewards.
Yes, it’s another of the cards from last month’s card class featuring the Nature’s Harvest Bundle. Today details for the Nature’s Harvest Thank You card is the focus. Just as with the earlier posts featuring projects from the card class, the Nature’s Harvest Bundle and the Harvest Meadow Designer Series Paper combine to create a beautiful card. So you can recreate the card, project materials and an assembly video is below.
Card Materials:
Nature’s Harvest Bundle
Bumblebee Cardstock: 4-1/4″ x 11″, score and fold at 5-1/2″ to create card base
Basic White Cardstock: 2 pieces of 5-1/4″ x 4″ (layer for base, card interior); scrap for sentiment
Harvest Meadow Designer Series Paper: 5″x 3-3/4″; bumblebee print piece (2″ x 4″ approx for die cutting)
Soft Succulent cardstock: piece for die cutting 2 “sheaf” pieces (approx 2″ x 4-1/4″ each)
Ink: Soft Succulent Classic Ink Pad
Linen Thread
Stampin’ Cut & Emboss Machine or other die cutting machine
Adhesive
Stampin’ Dimensionals
Assembly video:
Are you interested in the card classes? Card classes are offered via a To-Go Kit. The kit includes precut materials and embellishments for creating the projects. Assembly instructions are provided via video. There is also the option for purchasing the featured stamp set or bundle. You’ll need to supply adhesive(s) and inks. All other materials are included in the kits.
The next To-Go kit features holiday cards, email me ([email protected]) and put October Card Kit in the subject line for details on the class. Also if you’d like to be added to the mailing list for card classes, let me know via email.
REMINDERS
One of the biggest promotions of the year, Sale-a-Bration, has begun. This promotion will run through September 30. Sale-a-bration enables you to earn FREE product for each $50 product purchase. There are some great products available so check out the link to the Sale-A-Bration brochure.
SEPTEMBER PAPER PUMPKIN – HAUNTS & HARVEST
Hay, there! Experience everything the autumn season has to offer with the Haunts & Harvest Paper Pumpkin Kit! This month’s kit includes enough supplies to create 12 treat boxes—4 each of 3 designs. That means you can take your pick of apple, pumpkins, or jack-o-lantern treat boxes! Plus, the Paper Pumpkin box is designed to easily transform into a vintage wheelbarrow for you to display your harvest!
Whether you’re thinking about crisp red apples or you’re ready to carve some spooky jack-o-lanterns (or both!), the Haunts & Harvest Paper Pumpkin Kit—designed in a vivid fall palette—is a hands-on crafting experience for all autumn lovers!
Additional Details:
Kit contains enough supplies to create 12 treat packages—4 each of 3 designs. The all-inclusive kit includes printed die-cut boxes, die-cut sheets, adhesive, and more!
Finished treat box size: 2-1/2″ x 2″
Includes an exclusive stamp set and a Classic Stampin’ Spot
You can order this month’s Paper Pumpkin by clicking this link.
Margaret’s Customer Loyalty Program: Download the form (Customer Loyalty Form) for program details and start tracking your orders. Remember for orders over $150, you’ll also receive rewards from Stampin’ Up! You can order by clicking this link: Margaret’s Online Store. (please confirm that it says you’re shopping with Margaret Knight) Thank you for selecting to place your order with me. I truly appreciate your business.
Thanks for stopping by! Happy crafting,
Project Materials:
The September host code is: WK99NESD. Please use this code if your order is $150 or less (before shipping & taxes). Remember, if your order is over $150, you will receive the host rewards.
The content in this blog is the sole responsibility of Margaret Knight as an Independent Stampin’ Up!® Demonstrator. The use of and content of classes, services or products offered is not endorsed by Stampin’ Up!®