This month the card class features the Paper Florist Dies from the Stampin’ Up! 2023-2024 Annual Catalog for card creation. These dies offer a vast range of combinations to create beautiful flowers. The flowers can be used on cards or 3-D projects. Today’s Paper Florist card creation uses the Memories and More Card Pack for a larger card base plus cardstock and designer series paper layers to highlight the stunning flowers.
Paper Florist Card Creation Materials
Paper Florist cut pieces:
5 petal die: Basic White cardstock 3″ x 1-3/4″ (for one die cut) cut 4 large and 4 small (each flower uses 2 large/2 small)
4 petal die: Masterfully Made Designer Series Paper 2-3/4″ x 2-3/4″ (cut once for 2 large/2 small)
Flower Buds Die: cut twice for 6 buds (use scraps of Blackberry Bliss Cardstock) Bud Stems: Granny Apple Green Cardstock – scraps to cut 2 stems
Largest Leaves: Seafoam Green – cut 2 from scraps (approximately 1-1/2″ x 3″ for each)
Small Leaf: Lemon Lime Twist- cut 1 from scrap (approximately 1-1/8″ x 1-1/2″)
Basic Black Cardstock: scraps to cut centers for flowers
Cut Dimensions:
Berry Burst Layering Panel: 5-3/4″ x 3-3/4″
Delightfully Eclectic Designer Series Paper: 5-1/4″ x 3-1/4″
Basic White Cardstock: 2-3/4″ x 2-3/4″ (die cut with 2nd largest Stylish Shapes Dies Circle)
Bubble Bath Cardstock: 3″ x 3″ (die cut with largest Stylish Shapes Dies Circle)
Assembly Video
The Paper Florist Dies can be easily overlooked in the catalog (their shown on page 33 and in the Dies section in the back of the catalog). It took me viewing the catalog for a few weeks before spying them and I’m so glad that I ordered the dies! If you’ve overlooked them, be sure to add them to your order. You’ll be glad you did.
Margaret’s Customer Loyalty Program:
Thank you for shopping with me. Be sure to track your orders on my Customer Loyalty form.
Download the form (Customer Loyalty Form) for program details and start tracking your orders. Just a reminder: for orders over $150 you’ll also receive rewards from Stampin’ Up! You can order by clicking this link: Margaret’s Online Store. (please confirm that it says you’re shopping with Margaret Knight) Again, thank you for placing your order with me. I truly appreciate your business.
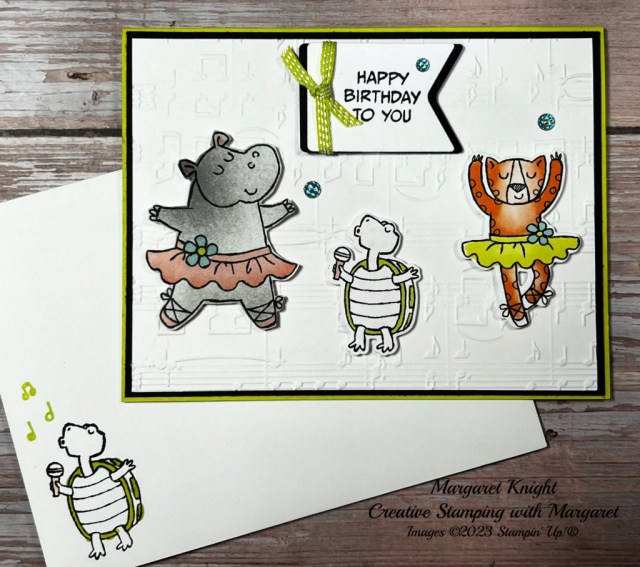
Can you believe it’s August! I know time seems to be flying by. Even though it’s August, I’m still sharing cards from the July card class featuring the Zany Zoo Bundle. This week’s card is a Zany Zoo Birthday Card. The whimsical card is appropriate for all ages but would be especially good for those hard to create preteen/teen cards. At least, for me those are the ages that challenge me when cardmaking. As in my last post featuring the Zany Zoo Bundle, the coordinating Zoo Crew Designer Series Paper is used for the characters. And since the turtle has the microphone (singing Happy Birthday), the Merry Melody 3D embossing folder creates a perfect base for the singer and his dancers. Below you’ll find cut dimensions and a video to help you recreate this fun card.
It’s A Zany Zoo Birthday Card Cut Dimensions:
Lemon Lime Twist Cardstock: 8-1/2″ x 5-1/2″ (score/fold at 4-1/4″ for card base)
Basic Black Cardstock: 5-3/8″ x 4-1/8″ (layering panel); scrap (die cut)
Basic White Cardstock: (2) 5-1/4″ x 4″ (embossing & card interior); scrap (sentiment)
Zoo Crew Designer Series Paper: fussy cutting & die cutting
Assembly Video
The fun characters on this card make me smile!
If you’d like to know when you projects are posted, be sure to subscribe to my blog so you don’t miss out. In addition, register for my newsletter – each month a FREE project tutorial is available for you to download.
August Card Class: Kit To-Go Option Available
The August class is featuring Fun Folds and will use the following stamp bundles:
Little Monkey
Seaside Bay
Trucking Along
Inked & Tiled
In addition to being offered in person, a “to-go” kit is available to craft at home. Details & registration can be found here. Register soon – deadline is August 7!
Speaking of kits – during the month of August, Stampin’ Up! is offering all kits in the Kits Collection (does not include Paper Pumpkin) at a discount of up to 30%.
This is a great time to order kits for yourself or to give as gifts. Everything needed to create the kit is included in the box. You can see all the kits in the Kits Collection by following this link.
Margaret’s Customer Loyalty Program:
Thank you for shopping with me. Be sure to track your orders on my Customer Loyalty form.
Download the form (Customer Loyalty Form) for program details and start tracking your orders. Just a reminder: for orders over $150 you’ll also receive rewards from Stampin’ Up! You can order by clicking this link: Margaret’s Online Store. (please confirm that it says you’re shopping with Margaret Knight) Again, thank you for placing your order with me. I truly appreciate your business.
Thanks for stopping by. Happy crafting and enjoy the weekend!
If you’re looking for a fun stamp set, look no further! The Zany Zoo Bundle from Stampin’ Up! is it. And to make the fun even better, add the coordinating Zoo Crew Designer Series Paper and you have a multitude of project possibilities. For today’s project, the card is titled “forest friends” for the skunk and bird image. This image has a stamp but for the card the coordinating die and designer series paper image were used. You’ll find the sentiment in the Artistically Inked Stamp Set or select your favorite sentiment. To embellish the envelope, the image is stamped and colored using Stampin’ Blends.
Assembly Video:
This card is one of four cards from the July 2023 monthly card class featuring the Zany Zoo Bundle. Over the next couple of weeks, I’ll be sharing the remaining cards using the bundle and designer series paper.
If you’d like to know when you projects are posted, be sure to subscribe to my blog so you don’t miss out. In addition, register for my newsletter – each month a FREE project tutorial is available for you to download.
August Card Class
The August class is featuring Fun Folds and will use the following stamp bundles:
Little Monkey
Seaside Bay
Trucking Along
Inked & Tiled
In addition to being offered in person, a “to-go” kit is available to craft at home. Details & registration can be found here.
Margaret’s Customer Loyalty Program:
Thank you for shopping with me. Be sure to track your orders on my Customer Loyalty form.
Download the form (Customer Loyalty Form) for program details and start tracking your orders. Just a reminder: for orders over $150 you’ll also receive rewards from Stampin’ Up! You can order by clicking this link: Margaret’s Online Store. (please confirm that it says you’re shopping with Margaret Knight) Again, thank you for placing your order with me. I truly appreciate your business.
Thanks for stopping by. Happy crafting and have a great week!
Today’s card has a “beachy vibe” using the Circle Sayings Bundle to create a thank you card. The card is one that was featured in last month’s class featuring the Circle Sayings Bundle. I had lots of fun creating different cards using the bundle but I think this card is one of my favorites. It’s also a great card design to use for creating multiples. Just stamp the design multiple times and color with the Stampin’ Blends. I like to stamp multiple images to have ready for coloring when watching tv or when I have a few minutes to spare. It helps avoid feeling rushed to finish a card. By having components prepped, components can be pulled together for finishing the card at a later date. Give my method a try!
Cut Dimensions:
Pebbled Path Cardstock: 5-1/2″ x 11″, score/fold at 4-1/4″ for card base
3″ x 3″ die cut Basic White Cardstock: (2) 4″ x 5-1/4″; 2-3-4″ x 2-3/4″
2023-2025 In Color Designer Series Paper: 4″ x 2-1/2″
Assembly Video
Don’t forget to subscribe to my blog…I have more fun projects to share soon. And while you’re at it, sign up for my newsletter – each month you can download a FREE project tutorial.
Margaret’s Customer Loyalty Program:
Thank you for shopping with me. Be sure to track your orders on my Customer Loyalty form.
Download the form (Customer Loyalty Form) for program details and start tracking your orders. Just a reminder: for orders over $150 you’ll also receive rewards from Stampin’ Up! You can order by clicking this link: Margaret’s Online Store. (please confirm that it says you’re shopping with Margaret Knight) Again, thank you for placing your order with me. I truly appreciate your business.
Thanks for stopping by. Happy crafting and have a great week!
We had Hey Chick in the past and now we have Hey Chuck! And Hey Chuck is just as much fun to use for creating projects. Today I am using the Hey Chuck Bundle to create a note card set. This project is from a recent gathering of Stampin’ Up! demonstrators from the state of Georgia. Attendees created the note card set as one of their projects.
To color the images watercolor pencils and a blender pen were selected. The technique of using watercolor pencils and a blender pen is often forgotten but is a great alternative to Stampin’ Blends. When using the technique, I recommend using the Thick White Cardstock as “pilling” with a blender pen is less likely to occur. Plus use a soft touch with the blender pen – think of holding a paint brush and likely smooth across the coloring to smooth and blend. To add additional interest, texture emboss the colored panels with the cross hatch Basics 3D Embossing Folder.
Don’t those chicks make you smile?
To recreate the Hey Chuck Note Card Set, a FREE tutorial is available. The tutorial is in the Events Section at the top of this post under the Tutorial Tab.
Don’t forget to subscribe to my blog…I have more fun projects to share soon. And while you’re at it, sign up for my newsletter – each month you can download a FREE project tutorial.
Margaret’s Customer Loyalty Program:
Thank you for shopping with me. Be sure to track your orders on my Customer Loyalty form.
Download the form (Customer Loyalty Form) for program details and start tracking your orders. Just a reminder: for orders over $150 you’ll also receive rewards from Stampin’ Up! You can order by clicking this link: Margaret’s Online Store. (please confirm that it says you’re shopping with Margaret Knight) Again, thank you for placing your order with me. I truly appreciate your business.
Thanks for stopping by. Happy crafting and have a great week!
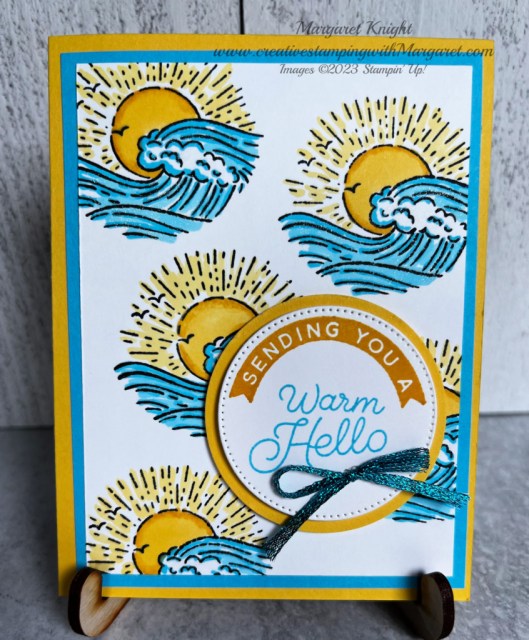
For this month’s card classes, the Circle Sayings Bundle from the Stampin’ Up! 2023-2024 Annual Catalog was featured. This Circle Sayings card offers a Warm Hello. The bundle includes the Circle Sayings Stamp Set, as well as, a coordinating 2-3/8″ Circle Punch. The stamp collection contains a variety of sayings that will fit within the circle punch. This makes it easy to cut out and create circular shapes for cards. Today’s card uses one of the stamps to create the background and a couple of other of the stamps from the set for the sentiment. A colorful card is easy to create using Stampin’ Blends to color and highlight the waves/sun image.
Cut Dimensions:
Daffodil Delight Cardstock: 5-1/2″ x 11″, score/fold at 4-1/4″ for card base, 2-3/4″ x 2-3/4″
Tahitian Tide Cardstock: 4″ x 5-1/4″
Basic White Cardstock: 3-3/4″ x 5″; 2-1/2″ x 2-1/2″
Assembly Video
The Circle Sayings Stamp Set offers a variety of sayings for different occasions. And of course, who doesn’t love a circle punch?! You’ll want to add the bundle to your stamp collections.
Don’t forget to subscribe to my blog…I have more fun projects to share plus another Circle Sayings project from the June class. Have a great week!
Margaret’s Customer Loyalty Program:
Thank you for shopping with me. Be sure to track your orders on my Customer Loyalty form.
Download the form (Customer Loyalty Form) for program details and start tracking your orders. Just a reminder: for orders over $150 you’ll also receive rewards from Stampin’ Up! You can order by clicking this link: Margaret’s Online Store. (please confirm that it says you’re shopping with Margaret Knight) Again, thank you for placing your order with me. I truly appreciate your business.
The content in this blog is the sole responsibility of Margaret Knight as an Independent Stampin’ Up!® Demonstrator. The use of and content of classes, services or products offered is not endorsed by Stampin’ Up!®


