The new 2020-2021 Annual Catalog from Stampin’ Up! is now “live” and available for product ordering. There are many beautiful new stamp sets, stamp bundles, embellishments and tools available. Plus, the five new In Colors! It’s difficult to decide which items to focus on first. In a couple of my recent posts, I have been able to share a few of the products from my preorder. Today, I am sharing a Stampin’ Up! video that showcases the new Peony Garden Suite. This suite was the first to catch my eye when I was able to preview the catalog. It was not available for preorder so it was placed at the top of my wish list. Once catalog ordering became available on Wednesday, I placed my order with the Peony Garden Suite the first item entered. Like a kid at the holidays, I’m anxiously awaiting delivery!
Check out this beautiful suite of products below…
Isn’t this a beautiful product suite? I can’t decide which is my favorite – the Prized Peony Bundle, the Peony Garden Designer Series Paper or the Dainty Diamonds 3D Embossing Folder! Under Project Materials is the link for the full suite and links for each individual product in the suite.
Fingers Crossed: My order is due for delivery on Monday, so stay tuned. Later next week, I will be featuring products from the Peony Garden Suite.
Check back on Monday as I’ll be sharing a project featuring other new products. Thanks for stopping by today and have a great weekend.
Project Materials: (click on link to order)
The Host Code for June is K3A9P6XS. Please use Host Code only if your order is less than $150. If your order exceeds $150, you will receive the host rewards! Prior to completing your order, you will have the opportunity to enter the code into the blank space labeled Host Code. Thank you!
Each week the Playtime with Paper team holds a design challenge. For this past week, a Color Challenge using Flirty Flamingo, Shaded Spruce and Coastal Cabana was selected. I chose the Tasteful Touches Stamp Set in the 2020-2021 Annual Catalog. This is a new stamp set available for purchase starting today. (WOOHOO!) The stamp set is part of the In Good Taste Suite that includes other coordinating products. Notice the touches of gold foil leaves? They are another new product so read card details to learn where you can find them.
Card Details:
Create a card base using Coastal Cabana cardstock (5-1/2″ x 8-1/2″, score in center at 4-1/4″ and fold).
On a 4″ x 5-1/4″ piece of Whisper White cardstock, stamp the sentiment in the upper right corner using Coastal Cabana Classic Stampin’ Pad. Next using the leaves stamp and Shaded Spruce Classic Stampin’ Pad, stamp the leaves . NOTE: ink stamp once and stamp 3 times before inking stamp again. Attach to the card base.
Cut a 4″ x 1-1/2″ piece of Shaded Spruce cardstock and texture emboss using the Tasteful Textile 3D Embossing Folder. Add to lower front of the card.
Stamp the flower onto a 3″ x 3″ piece of Whisper White cardstock using Flirty Flamingo Classic Stampin’ Pad. Fussy cut with paper snips. Color the flower with the Light Flirty Flamingo Stampin’ Blend Marker.
Attach gold leaves from the Forever Gold Laser-Cut Specialty Paper to the back of the flower. Use Stampin’ Dimensionals to add the flower to the card front overlapping the Shaded Spruce layer.
Complete by embellishing with the gold Metallic Pearls.
The 2020-2021 Annual Catalog is now available for you to order from. The catalog is online via the Catalog tab or email me if you would like a print copy.
Thanks for stopping by today. Look for more posts featuring new products!
Project Materials: (click on link to order)
The Host Code for June is K3A9P6XS. Please use Host Code only if your order is less than $150. If your order exceeds $150, you will receive the host rewards! Prior to completing your order, you will have the opportunity to enter the code into the blank space labeled Host Code. Thank you!
It’s a new month and to kick it off, we have the June 3D Tutorial Bundle! We have the fabulous Tammy Civello joining us as a guest designer for this month’s 3D tutorial. In addition to the tutorial bundle, the team is featuring a blog hop! Even better, we’re each sharing a second project created using the same products to coordinate with our tutorial project. This month, the team is featuring products from the Flowers for Every Season Suite for our projects. This suite of products is in the upcoming 2020-2021 Annual Catalog and will be available for purchase on June 3.
Remember, the projects designed for the 3D tutorial bundle aren’t available elsewhere online. Therefore, you’ll receive EXCLUSIVE projects in the tutorial bundle. In addition, both Imperial and Metric measurements are included for each project.
Now for a Sneak Peek of the June 3D projects…
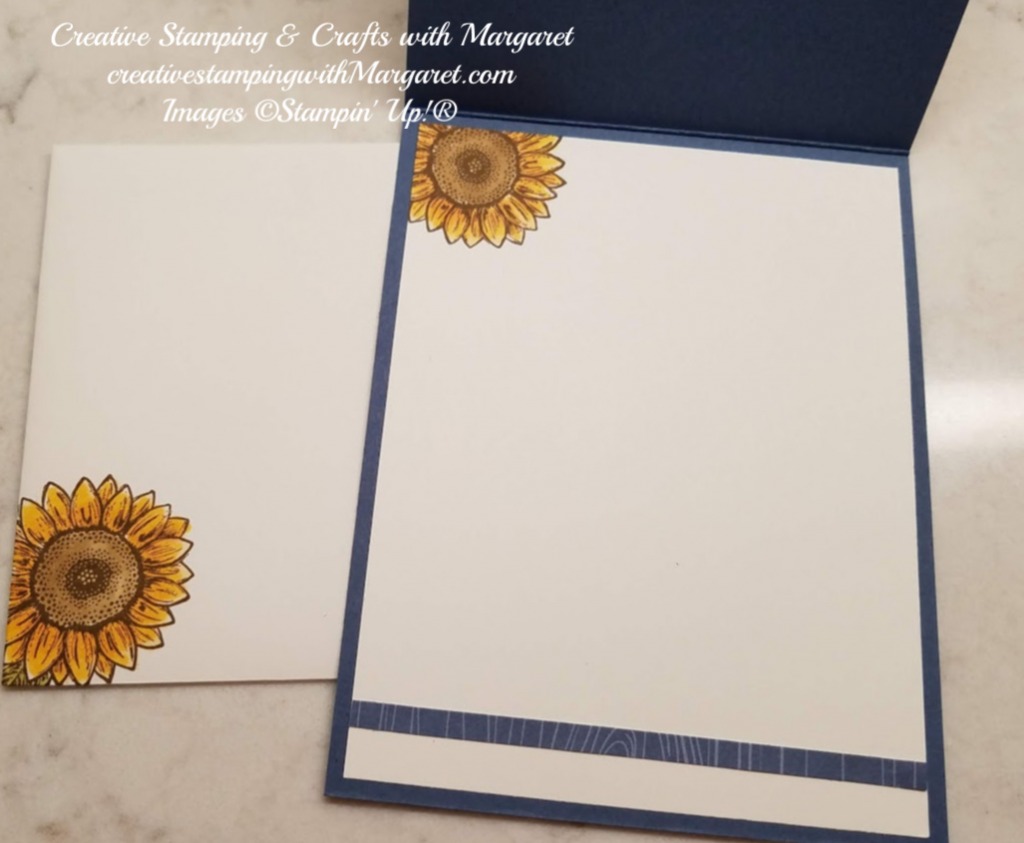
Here’s my bonus project to coordinate with my June 3D tutorial. It features the Celebrate Sunflowers Bundle which is included in the Flowers for Every Season Suite. Also, check out the new In-Color, Misty Moonlight.
Card Details:
Using a 4-1/4″ x 11″ piece of Misty Moonlight cardstock, score at 5-1/2″ and fold to create the card base.
A layer of 4-1/8″ x 5-3/8″ piece of the Misty Moonlight In Color 6″ x 6″ Designer Series.
With the large sunflower stamp from the Celebrate Sunflowers Stamp Set, stamp the image onto a 3-1/2″ x 3-1/2″ piece of Whisper White cardstock using Soft Suede Classic Stampin’ Pad. Color the sunflower image using the following Stampin’ Blends Markers: Light Soft Suede (flower center), Light So Saffron, Light Pumpkin Pie and Dark Daffodil Delight (flower petals). Cut using the coordinating die from the Sunflowers Dies.
On a 4-1/2″ x 3-1/2″ piece of Whisper White cardstock, stamp the sentiment on the lower right side of the cardstock using the Misty Moonlight Classic Ink Pad (Item #153118). Lucky for me, an ink spot of this color is in the May Paper Pumpkin kit!
Stamp three (3) of the large leaves from the Celebrate Sunflowers stamp set onto the Whisper White cardstock using Old Olive Classic Stampin’ Pad. TIP: for determining placement of the leaves, lay the die cut sunflower onto the cardstock to give you an idea where to stamp the leaves. Remove the sunflower and then stamp the leaves. Color the leaves using the Light Old Olive Stampin’ Blends Marker. Next adhere to the card offset by aligning the Whisper White edge with the right edge of the Designer Series Paper layer.
Attach the die cut sunflower to the card using Stampin’ Dimensionals.
Embellish by adding the Misty Moonlight Enamel Dots (from the 2020-2022 In Color Enamel Dots package).
One more thing – embellish the card interior and the envelope!
For easy ordering, check out all the products in the Flowers for Every Season Suite (Item #154132). The suite offers lots of products for creating a variety of floral themed cards and projects. Remember, the new in color and suite items can be ordered beginning on June 3, 2020.
Would you like the Tutorial Bundle?
You have several ways of receiving the 3D Tutorial Bundle:
1. Order $50 (before taxes and shipping) from my online store between now and June 30, 2020 and you’ll get the PDF for FREE. Note: be sure to register and allow me to contact you so I receive notice of your order and can send the tutorial.
2. Purchase the June 3D Tutorial Bundle PDF (a total of 6 tutorials) for $15.00. This is a one-time purchase. Simply drop me an email at creativestampingwithMargaret@gmail.com and I will send you a PayPal Invoice. Upon receipt of payment, I will send you the tutorial bundle.
3. Join my Playtime with Paper team! Team members always receive the tutorials for FREE!
You can place your product orders directly via my online store. Or, you can also order via the links under Project Materials (either the bundle or individual components).
Thank you for stopping by today and happy crafting!
The Host Code for June is K3A9P6XS. Please use Host Code only if your order is less than $150. If your order exceeds $150, you will receive the host rewards! Prior to completing your order, you will have the opportunity to enter the code into the blank space labeled Host Code. Thank you!
Due to the current health situation, many weddings have to be postponed. When the event is rescheduled, be prepared with a beautiful card. I’m calling today’s card the Poppy Moments Wedding Card, since it features poppies cut with the Poppies Moments Dies. The sentiment and label are from the So Sentimental Bundle. Due to social distancing, the May card class was held via Zoom and participants had fun creating this card together virtually.
And hip, hip, hooray! I have a You Tube video tutorial for you. It’s the first, but I promise you not the last that I’ll create. Yes, it took me awhile but I think I have the filming and editing somewhat figured out. Who said you can’t teach an old dog new tricks! LOL If you scroll past the video, you’ll find the list of materials needed to create the card and assembly details.
Card Materials:
Card Base: Whisper White Thick Cardstock (5-1/2″ x 8-1/2″, score at 4-1/4″ and fold)
Layer 1: Whisper White cardstock (5-1/4″ x 4″)
Subtle 3D Embossing Folder
Poppy Moments Dies
So Sentimental Bundle (So Sentimental Stamp Set and Stitched So Sweetly Dies)
Tuxedo Black Memento Ink Pad
Petal Pink cardstock (3-3/4″ x 2-1/2″ for label; 2″ x 4″ for poppies)
Vellum cardstock (2″ x 4″ for poppies)
Soft Seafoam Green cardstock – scraps for leaves
Old Olive cardstock (scraps for leaves
Basic Black cardstock (scrap piece for flower stamens)
Petal Pink Metallic-Edge Ribbon (on the Last-Chance Products list)
Pearl Basic Jewels
Basic Adhesive Backed Sequins (on the Last-Chance Products list)
Multipurpose Liquid Glue
Mini Glue Dots
Stampin’ Dimensionals
Card Directions & Assembly:
Using the Subtle 3D Embossing Folder, texture emboss the 5-1/4″ x 4″ Whisper White cardstock. After embossing, adhere to the Whisper White Thick cardstock base.
Cut the following using the Poppy Moments Dies:
Petal Pink poppy flower outlines – 2
Vellum Cardstock poppy flower bodies – 2
Soft Seafoam Cardstock small leaves – 2
Old Olive cardstock small leaves overlays – 2
Soft Seafoam cardstock slender leaves – 3
Old Olive cardstock slend leaves overlays – 3
Basic Black small flower stamens – 2
Attach the overlays to the leaves using Multipurpose Liquid Adhesive.
Next, add the Poppy overlays to the Vellum Poppy bodies by using a Mini Glue Dot in the center of the overlay. NOTE: The overlay is not attached completely to the vellum, just attached at the center.
With mini glue dots, add the Basic Black stamen to the center of the Poppy overlay.
Stamp the sentiment onto the Petal Pink and cut label shape.
Add the leaves and flowers to the back of the label.
Attach the label piece to the front of the card with Stampin’ Dimensionals.
Embellish the center of the stamen with Pearls Basic Jewels.
Tie a small knot bow with the Petal Pink Metallic-Edge Ribbon. Add to the card with a mini glue dot and embellish the card with the Basic Adhesive Backed Sequins.
All the materials for recreating this card will be available in the upcoming new Annual Catalog except for the ribbon and the sequins. If you want the Petal Pink Metallic-Edge Ribbon or the Basic Adhesive Backed Sequins, be sure to order quickly!
Just a reminder:
Be sure to check the Last-Chance Products list to order some of your favorite products from the current catalog before they are no longer available. The final day to order the last-chance products is June 2 or while supplies last.
Thank you for stopping by and happy crafting!
Project Materials: (click on link to order)
The Host Code for May is R929JEAV and the Host Code for June is K3A9P6XS. Please use Host Code only if your order is less than $150. If your order exceeds $150, you will receive the host rewards! Prior to completing your order, you will have the opportunity to enter the code into the blank space labeled Host Code. Thank you!
At the recent Luv 2 Stampin GA group meeting, we held a card swap to share card ideas with one another. For my creation, the goal became combining new product with retiring products. For the new product, I choose the new Blossoms in Bloom Bundle. The Blossoms In Bloom Stamp Set and coordinating Many Layered Blossoms Dies offer versatility for creating beautiful floral themed cards. Mark your calendar, you can order this set on June 3, 2020. For the card below, I stamped the blossoms stamp and die cut an overlay from the retiring Woven Threads Designer Series Paper. I love the look the designer series paper gives to the flowers. Details for you to recreate the card are below.
Card Details:
Create card base by cutting a piece of Rococo Rose cardstock 8-1/2″ x 5-1/2″, then score at 4-1/4″ and fold.
With the Many Layered Blossoms Dies, cut the Woven Threads Designer Series Paper (6″ x 6″ piece) to create overlay. Check out the discounted price under Project Materials below!
Cut Whisper White cardstock layer – 5-1/4″ x 4″. Use the cut blossoms layer as your guide to determine where to stamp the flower centers.
Using the large blossoms stamp from the Blossoms In Bloom Set, stamp onto the Whisper White cardstock with Seaside Spray Classic Stampin’ Pad. Attach to the Rococo Rose card base using adhesive.
Add the blossoms overlay to the stamped blooms using Stampin’ Dimensionals.
On a scrap piece of Whisper White (approximately 1/2″ x 2-1/2″), stamp the sentiment using Rococo Rose Classic Stampin’ Pad. This sentiment comes from the Colorful Seasons Stamp Set. After stamping, cut a “v shape” to create a pennant end. Add to the card using Mini Glue Dots.
Finish the card by tying a knotted bow using the Rococo Rose Scalloped Ribbon and attach beside the sentiment with glue dots.
The Blossoms In Bloom Bundle will offer you lots of creative options. Be sure to order it on June 3 and have fun using Designer Series Papers to create different layering pieces.
Just a reminder:
Be sure to check the Last-Chance Products list to order some of your favorite products from the current catalog before they are no longer available. The final day to order the last-chance products is June 2 or while supplies last.
Thank you for stopping by and happy crafting!
Project Materials: (click on link to order)
The Host Code for May is R929JEAV and the Host Code for June is K3A9P6XS. Please use Host Code only if your order is less than $150. If your order exceeds $150, you will receive the host rewards! Prior to completing your order, you will have the opportunity to enter the code into the blank space labeled Host Code. Thank you!
The content in this blog is the sole responsibility of Margaret Knight as an Independent Stampin’ Up!® Demonstrator. The use of and content of classes, services or products offered is not endorsed by Stampin’ Up!®