WOW! Can you believe it’s already July? There is lots happening this month. To start the month, we have the July 3D Tutorial Bundle! In addition to the tutorial bundle, the team is featuring a blog hop! (links at bottom of blog post) Even better, we’re each sharing a second project created using the same products to coordinate with our tutorial project. This month, the team is featuring products from the Playful Pets Suite. This product suite will have you and pet lover friends howling or purring with delight!
Remember, the projects designed for the 3D tutorial bundle aren’t available elsewhere online. Therefore, you’ll receive EXCLUSIVE projects in the tutorial bundle. In addition, both Imperial and Metric measurements are included for each project.
Now for a Sneak Peek of the July 3D projects…
You’ll love the cute 3D project designs!
For my coordinating project, I have a cute gift card holder design for you.
And here’s the card interior:
Gift Card Details:
Refer to the photo below for cutting and scoring to create the gift card holder. Real Red cardstock is used for the base.
In addition, cut the following:
Real Red cardstock: 2-3/4″ x 4-1/4″ (calling it horizontal panel)
Playful Pets Designer Series Paper (DSP): 2 coordinating pieces each 2-1/2″ x 4″; strip for interior 3/4″ x 4″; select the 2 dogs from the DSP and fussy cut
Whisper White cardstock: 4″ x 5-1/4″
Referring to the photos, cut, score and fold the gift card base. Add a strong adhesive such as Tear & Tape along the sides of the panel with 1/2 circle. To create the gift card pocket, fold the panel along the score line toward the 5-1/2″ score line.
Next, attach the coordinating Playful Pets Designer Series Paper pieces to the front of the card, to the 2-3/4″ x 4-1/4″ horizontal Real Red cardstock panel and to the interior pocket of the card. The Stampin’ Seal adhesive is great for this!
For the gift card interior:
On the Whisper White cardstock, stamp the dog bowl on the lower right corner of the cardstock using Memento Tuxedo Black Ink. Color the bowl with the Real Red Dark Stampin’ Blends. Then, add the fussy cut dog to the left corner of the Whisper White cardstock and use the Stampin’ Seal to add the Whisper White panel to the gift card interior. I love the expression on the dog’s face!
For the card front:
Cut a 16″ piece of the black & white baker’s twine from the Playful Pets Trim Combo pack. Wrap the twine around the card so it can be used to tie the card closed on the right side. Now, position the horizontal Real Red cardstock panel so that it is centered and aligns evenly with the right side of the gift card base. Carefully attach to the card ensuring you adhere the baker’s twine and that the adhesive is only on the front portion. If it extends past the folded gift card portion, it will become attached to the card interior. Optional: add a small amount of liquid glue to the baker’s twine and attach to the back of the horizontal Real Red panel – keep open until it dries.
Select the sentiment from the Pampered Pets Stamp Set. Stamp onto a scrap of Whisper White cardstock using Memento Tuxedo Black Ink. Next, cut the shape using the Tasteful Labels Dies.
Finish the front of the horizontal Real Red panel by adding the sentiment label using Stampin’ Seal. Then, add the fussy cut dog using Stampin’ Dimensionals.
For the final touch, add a Playful Pets Trinket to the dog’s paw. Tie the twine into a bow to close the gift card.
Optional: Add a piece of the Playful Pets Designer Series Paper to the flap on the envelope.
Have fun creating with the Playful Pets Suite Collection! The variety of dogs and cats offer multiple creative options for pet lovers.
Would you like the July 3D Tutorial Bundle?
You have several ways of receiving the July 3D Tutorial Bundle:
1. Order $50 (before taxes and shipping) from my online store between now and July 31, 2020 and you’ll get the PDF for FREE. Note: be sure to register and allow me to contact you so I receive notice of your order and can send the tutorial.
2. Purchase the July 3D Tutorial Bundle PDF (a total of 6 tutorials) for $15.00. This is a one-time purchase. Simply drop me an email at [email protected] and I will send you a PayPal Invoice. Upon receipt of payment, I will send you the tutorial bundle.
3. Join my Playtime with Paper team! Team members always receive the tutorials for FREE!
You can place your product orders directly via my online store. Or, you can also order via the links under Project Materials (either the bundle or individual components).
Speaking of ordering – the Bonus Days promotion begins today!
What is Bonus Days? For every $50 you spend 1 July–3 August 2020 (before shipping and tax), you earn a $5 Bonus Days coupon code that can be redeemed 4–31 August 2020. There is no limit to the number of Bonus Days coupon codes that you can collect so start shopping! You’ll be able to use the Bonus Days coupon codes for your August-December Mini Catalog orders.
Have you taken note that I enjoy using the various products in the Flowers for Every Season Suite Collection? I just realized that my past few posts have incorporated items from the suite. So of course, today’s post is no different! I’m loving the versatility of the product suite. It provides the ability to combine the different elements to create a variety of cards. Today’s card uses the Flowers for Every Season Memories & More Card Pack, as well as, a piece of the Flowers for Every Season Designer Series Paper.
Here are some of the card details:
The front of the card base is texture embossed using the Subtle 3D Embossing Folder. The floral print layer is from the Flowers for Every Season Memories & More Card Pack. The 1-1/4″ strip is a piece of the Flowers for Every Season Designer Series Paper. After stamping and cutting the sentiment layer, add a few sprigs of leaves from the Forever Gold Laser-Cut Specialty Designer Series Paper to the label. Finally, complete by embellishing with a small bow.
The design is the from the weekly design challenge for the Playtime with Paper team. Each week, I select a design or color challenge for the team to use. Below is this week’s challenge from the Sunday Stamps Blog.
In addition to my take on the design, I am including a card created by Playtime with Paper team member, Linda Edwards of Crafty Heron Designs. Linda’s card features the Forever Greenery Suite Collection. Isn’t her card stunning?
Speaking of the Playtime with Paper team, this month is a great time to join Stampin’ Up! and becoming a member of my team. From now until June 30, not only will you your Starter Kit—already a great value at $99 for $125 worth of products—but for a limited time, you can select any stamp/tool bundle from the new 2020–2021 Annual Catalog for FREE. There could not be a better time to join the Playtime with Paper team. Just click here to join now and take advantage of this special joining offer. Be sure to contact me with any questions you may have about joining. I’d love to have you on the Playtime with Paper team!
Reminder:
The June Tutorial Bundle is available for purchase.
You have several ways of receiving the 3D Tutorial Bundle:
1. Order $50 (before taxes and shipping) from my online store between now and June 30, 2020 and you’ll get the PDF for FREE. Note: be sure to register and allow me to contact you so I receive notice of your order and can send the tutorial.
2. Purchase the June 3D Tutorial Bundle PDF (a total of 6 tutorials) for $15.00. This is a one-time purchase. Simply drop me an email at [email protected] and I will send you a PayPal Invoice. Upon receipt of payment, I will send you the tutorial bundle.
3. Join my Playtime with Paper team! Team members always receive the tutorials for FREE!
Thank you for stopping by today and happy crafting!
Project Materials: (click on link to order)
The Host Code for June is K3A9P6XS. Please use Host Code only if your order is less than $150. If your order exceeds $150, you will receive the host rewards! Prior to completing your order, you will have the opportunity to enter the code into the blank space labeled Host Code. Thank you!
While waiting for delivery of my new product order, I continue to create cards using the items from my preorder. One of the suites demonstrators could order early is the Flowers for Every Season Suite. The suite is full of products that coordinate. For today’s Celebrate with Sunflowers card, the Flowers for Every Season 6″ x 6″ Designer Series Paper provides a beautiful floral base for the sentiment. With the colorful designs in the paper, it makes it easy to create beautiful cards. The designer series paper design incorporates the new 2020-2022 In Colors, so I used the coordinating cardstock for the card. The sentiment and leaf embellishments are in the Celebrate Sunflowers Bundle which is also part of the Flowers for Every Season Suite.
Card Details:
Card base: Cut Cinnamon Cider cardstock 5-1/2″ x 8-1/2″, score at 4-1/4″ and fold.
First Layer: Bumblebee cardstock cut to 5-1/4″ x 4″. Attach to the Cinnamon Cider cardstock card base.
Cut the sunflower print from the Flowers for Every Season Designer Series paper to 5″ x 3-3/4″. Adhere to the Bumblebee cardstock layer.
Stamp the sentiment from the Celebrate Sunflowers Stamp Set on the center of a 1-1/2″ x 4″ piece of Whisper White cardstock using Tuxedo Black Memento Ink Pad. Cut using the Stitched Rectangles Dies.
Using the Sunflowers Dies, cut 2 of the large leaves and the coordinating leaf veins from Just Jade cardstock. Assemble the leaves by adding the veins to the coordinating leaf. TIP: Use the Adhesive Sheets for the leaf veins. This makes it easy to attach to the coordinating leaf base.
Add the leaves to the back of the sentiment label with adhesive and then attach the label to the card front using Stampin’ Dimensionals.
Tie a small bow using the Bumblebee In Color 1/4″ Ribbon and add to the side of the sentiment label.
Embellish the label using the Cinnamon Cider Enamel Dots from the 2020-2022 In Color Enamel Dots collection.
Under the Project Materials section, you’ll find links to the products used for this card. You can purchase the entire Flowers for Every Season Suite or just the individual components that you prefer.
Reminder:
The June Tutorial Bundle is available for purchase.
You have several ways of receiving the 3D Tutorial Bundle:
1. Order $50 (before taxes and shipping) from my online store between now and June 30, 2020 and you’ll get the PDF for FREE. Note: be sure to register and allow me to contact you so I receive notice of your order and can send the tutorial.
2. Purchase the June 3D Tutorial Bundle PDF (a total of 6 tutorials) for $15.00. This is a one-time purchase. Simply drop me an email at [email protected] and I will send you a PayPal Invoice. Upon receipt of payment, I will send you the tutorial bundle.
3. Join my Playtime with Paper team! Team members always receive the tutorials for FREE!
You can place your product orders directly via my online store. Or, you can also order via the links under Project Materials (either the bundle or individual components).
According to the latest tracking, the Big Brown Truck is nearby! So my order of new products will be arriving soon. Guess what I’ll be doing the remainder of the day?!
Thank you for stopping by today and happy crafting!
Project Materials: (click on link to order)
The Host Code for June is K3A9P6XS. Please use Host Code only if your order is less than $150. If your order exceeds $150, you will receive the host rewards! Prior to completing your order, you will have the opportunity to enter the code into the blank space labeled Host Code. Thank you!
The new 2020-2021 Annual Catalog from Stampin’ Up! is now “live” and available for product ordering. There are many beautiful new stamp sets, stamp bundles, embellishments and tools available. Plus, the five new In Colors! It’s difficult to decide which items to focus on first. In a couple of my recent posts, I have been able to share a few of the products from my preorder. Today, I am sharing a Stampin’ Up! video that showcases the new Peony Garden Suite. This suite was the first to catch my eye when I was able to preview the catalog. It was not available for preorder so it was placed at the top of my wish list. Once catalog ordering became available on Wednesday, I placed my order with the Peony Garden Suite the first item entered. Like a kid at the holidays, I’m anxiously awaiting delivery!
Check out this beautiful suite of products below…
Isn’t this a beautiful product suite? I can’t decide which is my favorite – the Prized Peony Bundle, the Peony Garden Designer Series Paper or the Dainty Diamonds 3D Embossing Folder! Under Project Materials is the link for the full suite and links for each individual product in the suite.
Fingers Crossed: My order is due for delivery on Monday, so stay tuned. Later next week, I will be featuring products from the Peony Garden Suite.
Check back on Monday as I’ll be sharing a project featuring other new products. Thanks for stopping by today and have a great weekend.
Project Materials: (click on link to order)
The Host Code for June is K3A9P6XS. Please use Host Code only if your order is less than $150. If your order exceeds $150, you will receive the host rewards! Prior to completing your order, you will have the opportunity to enter the code into the blank space labeled Host Code. Thank you!
Each week the Playtime with Paper team holds a design challenge. For this past week, a Color Challenge using Flirty Flamingo, Shaded Spruce and Coastal Cabana was selected. I chose the Tasteful Touches Stamp Set in the 2020-2021 Annual Catalog. This is a new stamp set available for purchase starting today. (WOOHOO!) The stamp set is part of the In Good Taste Suite that includes other coordinating products. Notice the touches of gold foil leaves? They are another new product so read card details to learn where you can find them.
Card Details:
Create a card base using Coastal Cabana cardstock (5-1/2″ x 8-1/2″, score in center at 4-1/4″ and fold).
On a 4″ x 5-1/4″ piece of Whisper White cardstock, stamp the sentiment in the upper right corner using Coastal Cabana Classic Stampin’ Pad. Next using the leaves stamp and Shaded Spruce Classic Stampin’ Pad, stamp the leaves . NOTE: ink stamp once and stamp 3 times before inking stamp again. Attach to the card base.
Cut a 4″ x 1-1/2″ piece of Shaded Spruce cardstock and texture emboss using the Tasteful Textile 3D Embossing Folder. Add to lower front of the card.
Stamp the flower onto a 3″ x 3″ piece of Whisper White cardstock using Flirty Flamingo Classic Stampin’ Pad. Fussy cut with paper snips. Color the flower with the Light Flirty Flamingo Stampin’ Blend Marker.
Attach gold leaves from the Forever Gold Laser-Cut Specialty Paper to the back of the flower. Use Stampin’ Dimensionals to add the flower to the card front overlapping the Shaded Spruce layer.
Complete by embellishing with the gold Metallic Pearls.
The 2020-2021 Annual Catalog is now available for you to order from. The catalog is online via the Catalog tab or email me if you would like a print copy.
Thanks for stopping by today. Look for more posts featuring new products!
Project Materials: (click on link to order)
The Host Code for June is K3A9P6XS. Please use Host Code only if your order is less than $150. If your order exceeds $150, you will receive the host rewards! Prior to completing your order, you will have the opportunity to enter the code into the blank space labeled Host Code. Thank you!
It’s a new month and to kick it off, we have the June 3D Tutorial Bundle! We have the fabulous Tammy Civello joining us as a guest designer for this month’s 3D tutorial. In addition to the tutorial bundle, the team is featuring a blog hop! Even better, we’re each sharing a second project created using the same products to coordinate with our tutorial project. This month, the team is featuring products from the Flowers for Every Season Suite for our projects. This suite of products is in the upcoming 2020-2021 Annual Catalog and will be available for purchase on June 3.
Remember, the projects designed for the 3D tutorial bundle aren’t available elsewhere online. Therefore, you’ll receive EXCLUSIVE projects in the tutorial bundle. In addition, both Imperial and Metric measurements are included for each project.
Now for a Sneak Peek of the June 3D projects…
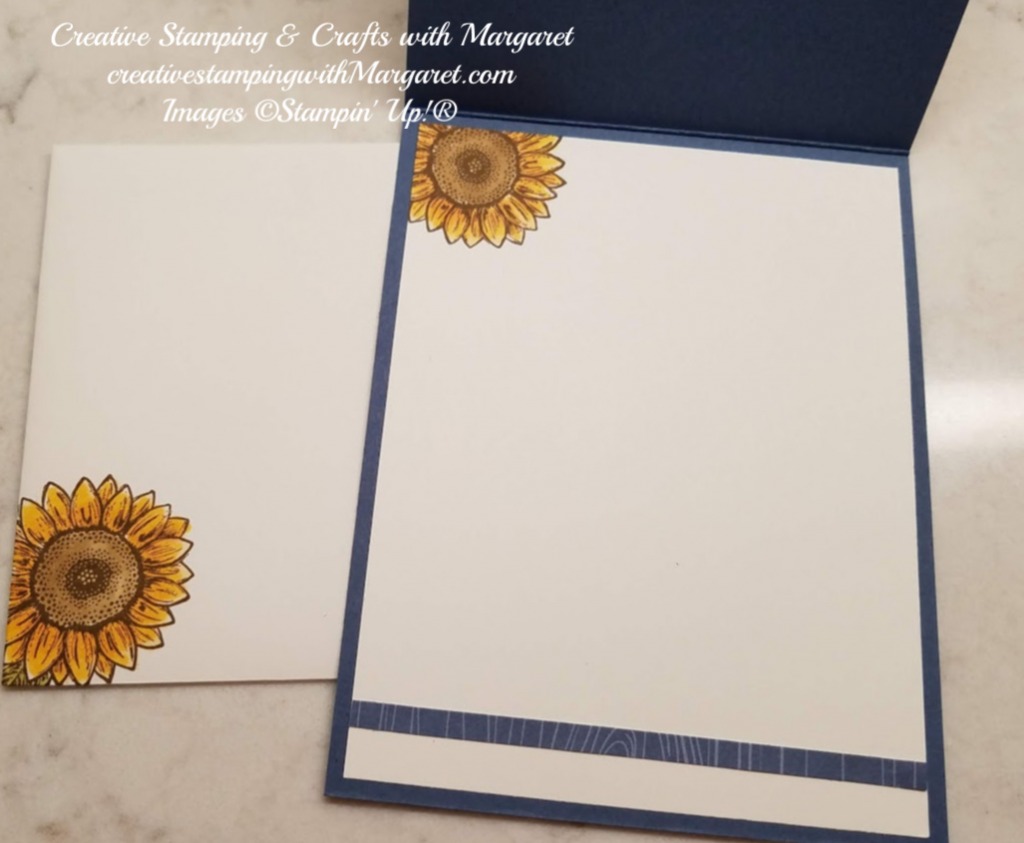
Here’s my bonus project to coordinate with my June 3D tutorial. It features the Celebrate Sunflowers Bundle which is included in the Flowers for Every Season Suite. Also, check out the new In-Color, Misty Moonlight.
Card Details:
Using a 4-1/4″ x 11″ piece of Misty Moonlight cardstock, score at 5-1/2″ and fold to create the card base.
A layer of 4-1/8″ x 5-3/8″ piece of the Misty Moonlight In Color 6″ x 6″ Designer Series.
With the large sunflower stamp from the Celebrate Sunflowers Stamp Set, stamp the image onto a 3-1/2″ x 3-1/2″ piece of Whisper White cardstock using Soft Suede Classic Stampin’ Pad. Color the sunflower image using the following Stampin’ Blends Markers: Light Soft Suede (flower center), Light So Saffron, Light Pumpkin Pie and Dark Daffodil Delight (flower petals). Cut using the coordinating die from the Sunflowers Dies.
On a 4-1/2″ x 3-1/2″ piece of Whisper White cardstock, stamp the sentiment on the lower right side of the cardstock using the Misty Moonlight Classic Ink Pad (Item #153118). Lucky for me, an ink spot of this color is in the May Paper Pumpkin kit!
Stamp three (3) of the large leaves from the Celebrate Sunflowers stamp set onto the Whisper White cardstock using Old Olive Classic Stampin’ Pad. TIP: for determining placement of the leaves, lay the die cut sunflower onto the cardstock to give you an idea where to stamp the leaves. Remove the sunflower and then stamp the leaves. Color the leaves using the Light Old Olive Stampin’ Blends Marker. Next adhere to the card offset by aligning the Whisper White edge with the right edge of the Designer Series Paper layer.
Attach the die cut sunflower to the card using Stampin’ Dimensionals.
Embellish by adding the Misty Moonlight Enamel Dots (from the 2020-2022 In Color Enamel Dots package).
One more thing – embellish the card interior and the envelope!
For easy ordering, check out all the products in the Flowers for Every Season Suite (Item #154132). The suite offers lots of products for creating a variety of floral themed cards and projects. Remember, the new in color and suite items can be ordered beginning on June 3, 2020.
Would you like the Tutorial Bundle?
You have several ways of receiving the 3D Tutorial Bundle:
1. Order $50 (before taxes and shipping) from my online store between now and June 30, 2020 and you’ll get the PDF for FREE. Note: be sure to register and allow me to contact you so I receive notice of your order and can send the tutorial.
2. Purchase the June 3D Tutorial Bundle PDF (a total of 6 tutorials) for $15.00. This is a one-time purchase. Simply drop me an email at [email protected] and I will send you a PayPal Invoice. Upon receipt of payment, I will send you the tutorial bundle.
3. Join my Playtime with Paper team! Team members always receive the tutorials for FREE!
You can place your product orders directly via my online store. Or, you can also order via the links under Project Materials (either the bundle or individual components).
Thank you for stopping by today and happy crafting!
The Host Code for June is K3A9P6XS. Please use Host Code only if your order is less than $150. If your order exceeds $150, you will receive the host rewards! Prior to completing your order, you will have the opportunity to enter the code into the blank space labeled Host Code. Thank you!
The content in this blog is the sole responsibility of Margaret Knight as an Independent Stampin’ Up!® Demonstrator. The use of and content of classes, services or products offered is not endorsed by Stampin’ Up!®