Feb 28, 2020 | Note Cards, Sale-a-bration 2020, Simple Stamping, Stampin' Blends |
One of my regular card class attendees recently had a fall and was injured. Since she had to miss the last class, I made a note card for the class group to sign so it could be sent to cheer her up. The Gang’s All Meer stamp set with the “from all of us” greeting along with the gang of meerkats made the perfect note card. Aren’t the meerkats and their expressions cute? They certainly guarantee smiles! The Gang’s All Meer is in the Sale-a-Bration brochure and is available for FREE with a $50 purchase (before tax & shipping) until March 31, 2020. 
Details on making the card:
The base is a Whisper White note card from a package of the Note Cards & Envelopes in the Stampin’ Up! Annual Catalog. Stamp the “gang” and the “from all of us greeting” onto a 4-1/2″ x 3″ piece of Whisper White cardstock using Tuxedo Black Memento Ink. Use the Soft Suede Stampin’ Blends to color the meerkats. With the Light Crumb Cake Stampin’ Blend color the ground. Cut a 15″ piece of Silver Metallic-Edge Ribbon. Color the ribbon with the Dark Pool Party Blends. Allow ribbon to dry for a few minutes, then tie the around the card front. Attach the card front to a 4-3/4″ x 3-1/4″ piece of Pool Party cardstock. To complete the card, attach the Pool Party layer to the note card base using Stampin’ Dimensionals.
The good news is Deborah has recuperated and will be stamping with the group at our upcoming class. We’re excited for her return!
Just a reminder…
Sale-a-bration continues until March 31, 2020. With qualifying purchases of $50 or more (before shipping & taxes), you can order FREE product. Check out the Sale-a-Bration brochure under the Catalog link. Note: the Metallic Baker’s Twine and Sequins Combo Pack (Item #152314) and the Kerchief Card Kit have sold out. As a reminder, Sale-a-Bration brochure product quantities are limited and may run out before the end of the promotion.
Thanks for stopping by! Check back again soon for another project idea.

Project Materials: (click on link to order)
The Host Code for February is ATS2GYY2. Please use Host Code only if your order is less than $150. If your order exceeds $150, you will receive the host rewards!
Jan 24, 2020 | Bundles, January-June 2020 Mini Catalog, Punches, Quick & Easy, Simple Stamping, Uncategorized |
If you’ve been following my blog you know that for the past three weeks, my husband and I were traveling. Well, vacation’s over and I’m trying to get back into the groove. Guess you would say that I’m suffering vacation withdrawal! Have you ever experienced it? In addition to visiting places on our bucket list, we celebrated our 42nd wedding anniversary. (yes, I was just a babe when we got married! LOL) Before leaving on the cruise, I made an anniversary card for my husband. It was definitely a surprise to him. He wondered when I had time to make the card between Christmas, packing for our trip, removing Christmas decorations on December 26 and watching the two grandchildren on New Year’s Eve. Fortunately, I was able to sneak in a few minutes from the busy schedule to make a simple stamping anniversary card. The Heartfelt Bundle and Country Club Designer Series Paper from the Mini Catalog were perfect to use for creating a quick card.

How to create the card:
Use Thick Whisper White cardstock for the card base. Next, add a 5-1/4″ x 4″ layer of Garden Green cardstock. The top layer is a piece of the plaid Country Club Designer Series Paper (3-3/4″ x 5″). Punch a Garden Green heart using the Heart Punch Pack from the Heartfelt Bundle. Stamp the dotted heart onto Whisper White cardstock using Night of Navy Stampin’ Pad. Use heart punch to cut the shape. The sentiment is from the Itty Bitty Greetings Stamp Set in the Annual Catalog. Add he green heart to the card using snail adhesive and layer the sentiment heart atop the green heart using Stampin’ Dimensionals. A Rhinestone Basic Jewel adds a touch of sparkle to the sentiment heart. Finish the card by wrapping the Silver Metallic-Edge Ribbon around the card and tying into a flat knot.
Hopefully, you were able to view my Facebook posts featuring photos of some of the spots visited. As we were cruising, internet was not reliable thus I did not post as many photos as planned. Our trip was outstanding and we were able to cross a few places off of our bucket list. Below are a couple of highlights from our excursion to Machu Picchu. Definitely, add this wonder to your trip bucket list.

Thank you for stopping by today. Have a great weekend and check back next week for more project ideas!

Remember: Sale-a-bration continues until March 31, 2020. With qualifying purchases of $50 or more (before shipping & taxes), you can order FREE product. Check out the Sale-a-Bration brochure under the Catalog link.
Project Materials: (click on link to order)
The Host Code for January is 6QHPCCUD. Please use Host Code only if your order is less than $150. If your order exceeds $150, you will receive the host rewards!
Nov 6, 2019 | 2019 Holiday Catalog, Brightly Gleaming Product Suite, Cards, Christmas, Holiday, Quick & Easy, Simple Stamping |
Have you noticed that I am now in full on Christmas mode?! The past couple of weeks, I have been enjoying creating a variety of Christmas themed cards and projects. Don’t worry though, I still have some Fall theme projects to share with you before the full force of Christmas arrives after Thanksgiving. Today’s post, Brightly Gleaming Merry Christmas, is another make ‘n take card from Stamping Bingo. The card elements include the Brightly Gleaming Specialty Designer Series Paper and the Christmas Gleaming Bundle from the Stampin’ Up! 2019 Holiday Catalog. The elements from the Brightly Gleaming Suite are elegant and gorgeous. It is easy to create simple but beautiful projects with the Brightly Gleaming Specialty Designer Series Paper and accompanying embellishments. That’s the case with the Brightly Gleaming Merry Christmas Card.

Card Details:
- For the card base, cut Pretty Peacock cardstock at 4-1-4″ x 11″, score at 5-1/2″ and fold on score line.
- The second layer is Very Vanilla cardstock, cut 4″ x 5-1/4″. To add texture, emboss with the Subtle 3D Embossing Folder. Attach to the card base with adhesive.
- Cut a 3″ x 4-1/4″ piece of the stripe design from the Brightly Gleaming Specialty Designer Series Paper. Using a strong adhesive, attach to the center of the Very Vanilla cardstock layer.
- Then use the ornament punch to cut an ornament shape from a coordinating piece of the Brightly Gleaming Specialty Designer Series Paper. Attach to a stitched oval cut from Very Vanilla cardstock using the Stitched Shapes Dies. Layer onto a Pretty Peacock cardstock scallop oval cut using the Layering Ovals Dies. Center onto the card front using Stampin’ Dimensionals.
- For the sentiment, stamp the Merry Christmas from the Christmas Gleaming Stamp Set onto a scrap of Very Vanilla cardstock using Pretty Peacock Classic Stampin’ Pad. Using paper snips, cut the around the perimeter of the sentiment. Refer to card photo for placement onto the card.
- To finish the card, embellish with the sprigs from the Brightly Gleaming Foil Elements. For the final embellishment, add a bow using the Old Olive/Pretty Peacock Reversible Ribbon.
Also, don’t forget to embellish the card interior…

Hope you enjoyed this project. Thanks for stopping by and check back soon for more inspiration. Happy crafting…
Project Materials: (click on link to order)
The Host Code for November is JBQQM6VR:. Please use Host Code only if your order is less than $150. If your order exceeds $150, you will receive the host rewards!
Sep 25, 2019 | 2019 Holiday Catalog, Designer Series Paper, Monster Bash Designer Series Paper, Quick & Easy, Simple Stamping |
Are you looking for a simple Halloween Card to make? This card has you covered! The beauty of the Monster Bash Designer Series Paper are the wonderful designs to use on craft creations. Notice the Designer Series Paper panel on the card below? It’s a bookshelf with interesting book titles and is one of my favorite papers from the package. With the Stylish Scroll Embossing Folder, you can easily take your card “up a notch” by adding texture to one of the card layers.

Card Details:
- Card Base is Terracotta Tile cardstock (5-1/2″ x 8-1/2″) score and fold at 4-1/4″.
- Cut a Basic Black layer 4″ x 5-1/4″. Attach to the Terracotta Tile card base with Snail Adhesive.
- Using a 3-3/4″ x 5″ piece of Crushed Curry cardstock, texture embellish using the Stylish Scroll Embossing Folder. Attach a 5″ x 2″ piece of Monster Mash Designer Series Paper to the lower half of the texture embossed Crushed Curry cardstock. Before adding to the Basic Black layer, wrap Basic Black Scalloped Edge Ribbon across the card front where the Designer Series Paper and Crushed Curry cardstock meet. (refer to photo)
- Punch the girl ghoul image from the Monster Mash Designer Series Paper with the 2″ circle punch. Add to top of the card using Snail Adhesive.
- Complete the card front by stamping the sentiment from the Spooktacular Bash Stamp Set with Memento black onto a scrap of Very Vanilla cardstock and cut with the coordinating Ornate Frames Dies. Attach to the card front with Stampin’ Dimensionals. Add a couple of the Monster Bash Enamel Shapes as an embellishment around the sentiment.
See how simple it is to make this card! The only stamping is for the sentiment.
Are you ready to order your Monster Bash supplies?
You can place your order by clicking on the items under Project Materials. Reminder: In the month of September, for every $50 order (before shipping & taxes), you’ll receive a Thank You gift of the Shimmery Crystal Effects from me.
Thank you for your support and I appreciate your business.
Thanks for stopping by and happy crafting! Project Materials: (click on link to order)
The Host Code for September is: J96YXBD3. Please use Host Code only if your order is less than $150. If your order exceeds $150, you will receive the host rewards!
Sep 18, 2019 | 2019 Holiday Catalog, Cellophane Bags, Holiday Catalog, Quick & Easy, Simple Stamping, Tags |
It’s such fun to give small “thinking of you” gifts and the 3″ x 6″ gusseted cellophane bags from Stampin’ Up! are the perfect size for such purpose. Naturally, the gift bag needs a gift tag and the one on the project below is quick and easy. This project is perfect for using up scraps of cardstock. Since we’re celebrating the arrival of Fall soon, leaves in Fall colors are used to embellish the tag. The Gather Together Bundle includes the Gather Together Stamp Set and the Gathered Leaves Dies. Can you see the dimension in the leaves? The dies not only cut but emboss! Details for creating the tag are listed below the project photo.
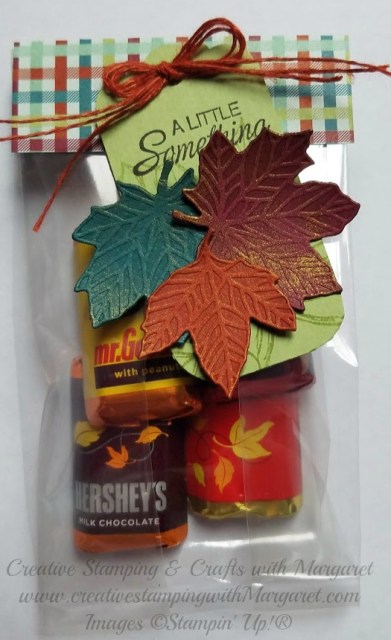
Card Details:
- To create tag base, cut a 1-1/2″ x 3″ piece of Pear Pizzazz cardstock. On one end of the cardstock, use the Delightful Tag Topper Punch to create the tag. Use the corner rounder section on the Detailed Trio Punch to round the edges on the opposite end of the tag.
- On the tag, stamp the large leaf from the Gather Together Stamp Set using Pear Pizzazz Classic Stampin’ Pad.
- Next, use the three leaves dies to cut a leaves from scraps of Merry Merlot, Pretty Peacock and Cajun Craze cardstock. One leaf in each color was cut. TIP: By first lightly spritzing the cardstock with water and then cutting with the dies. The embossed impression is much deeper. Plus when the cardstock dries, the edges of the leaves curl just as Fall leaves curl.
- While the leaves are drying, stamp the sentiment from the Parcels and Petals Stamp Set (in the Annual Catalog) onto the tag using Early Espresso Classic Stampin’ Pad.
- Once the cut leaves are dry, sponge Golden Glitz Delicata Metallic Ink onto each leaf. Layer the leaves onto the tag below the sentiment using Mini Stampin’ Dimensionals.
- After adding your treats to the 3″ x 6″ cellophane bag, fold top over approximately 3/4″ and secure with a staple. Fold 3″ x 2″ piece of Come to Gather Designer Series Paper in half and secure to the bag by using Snail Adhesive on each side of fold. (you are sandwiching the bag top inside the Designer Series Paper)
- Finish by adding the gift tag to the bag with Mini Stampin Dimensionals and add a Cajun Craze Linen Thread bow using a mini glue dot.
Reminder:
In the month of September, for every $50 order (before shipping & taxes), you’ll receive a Thank You gift of the Shimmery Crystal Effects from me. Thank you for your support and I appreciate your business.
Thanks for stopping by. Check back soon for more project ideas! Project Materials: (click on link to order)
The Host Code for September is: J96YXBD3. Please use Host Code only if your order is less than $150. If your order exceeds $150, you will receive the host rewards!
Sep 6, 2019 | 2019 Holiday Catalog, Holiday, Holiday Catalog, Simple Stamping |
Today, I am showcasing one of the cards from the Holiday Catalog Shoebox swap from a couple of weeks ago. The Gather Together bundle and other products from the Come to Gather Suite create a Fall themed card. Yes, the calendar says Fall is right around the corner but the weather here in Georgia is hanging on to Summer! Temperatures are forecast to reach near 100 this weekend! I hope that you’re having more moderate weather. Now back to the card. Notice the Cajun Craze leaves? The dies cut and emboss! I share a tip below on using the dies. The Gather Together card is a simple card that is perfect to send to family and friends.
Unfortunately, I do not have the name of the person that created the card design. We were all busy moving from station to station and neglected to gather names of each person with their creation! Lesson learned! We’ll put our names on our creations.

Card Materials:
- Base: Early Espresso cardstock (8-1/2″ x 5-1/2″, scored at 4-1/4″ for side fold card base)
- Very Vanilla cardstock: 3″ x 3″ for large leaf, 4″ x 5-1/4″ for interior, 2″ x 1″ for sentiment on front of card
- Cajun Craze cardstock: 2-1/2″ x 3″ for cut & embossed leaves
- Come to Gather Designer Series Paper: 2″ x 5-1/4″
- Classic Ink Pads: Cajun Craze & Pretty Peacock
- Cajun Craze Linen Thread from the Come to Gather Ribbon Combo Pack
Details:
- To create card base, fold the Early Espresso on the score line.
- Adhere the Come to Gather Designer Series Paper to the left side of the Early Espresso card base using Snail Adhesive.
- Stamp the large maple leaf using Cajun Craze onto the 3″ square of Very Vanilla cardstock. Cut using the coordinating die.
- Use the three embossed leaf dies to cut and emboss leaves from the strip of Cajun Craze cardstock. TIP: spritz the paper lightly with water before using your die cutter – this helps the dies break the fibers in the paper, which gives a deeper embossed impression. Plus the edges of the leaves curl slightly, just like a real leaf.
- With the strip of Very Vanilla, stamp the sentiment with Pretty Peacock. Trim to create the flag tail.
- Using snail adhesive, attach the three Cajun Craze leaves to the card (refer to photo for placement).
- Add the large stamped leaf with Stampin’ Dimensionals.
- Using adhesive, attach the sentiment to the lower portion of the card.
- With three strands of the Cajun Craze linen thread, tie a bow. Attach to the card front above the sentiment using a mini glue dot.
See how simple it is to create a beautiful Fall card. The embossed leaves dies add lots of dimension to projects with leaves. Be sure to get the Gather Together Bundle – you’ll find that it’s great for more than just Fall themed projects.
When ready, you can place your order here. In the month of September, for every $50 order (before shipping & taxes), you’ll receive a Thank You gift of the Shimmery Crystal Effects from me. Thank you for your support and I appreciate your business.
Thanks for stopping by. Have a great weekend!
Project Materials: (click on link to order)
The Host Code for September is: J96YXBD3. Please use Host Code only if your order is less than $150. If your order exceeds $150, you will receive the host rewards!


