Jan 20, 2021 | Cards, January-June 2021 Mini Catalog, Simple Stamping, Stampin' Up! |
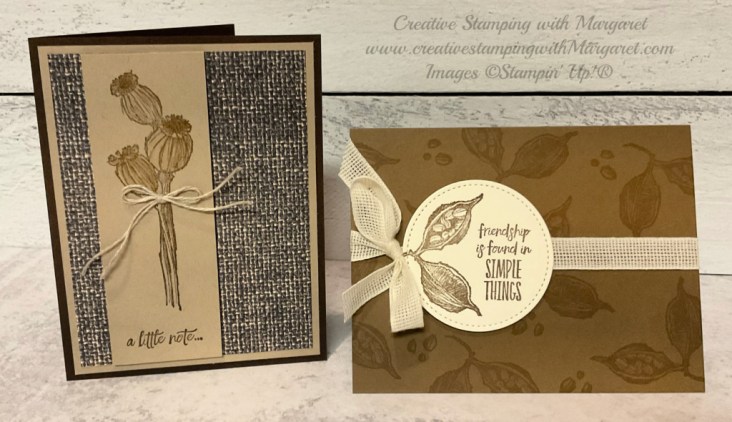
Have you ever purchased a stamp set and then wondered what type card design you were going to make once you received it? Well, that is the case with today’s stamp set, Enjoy The Moment. So what did I do? I selected a couple of the stamps and decided to play. No plan in mind but just to stamp. Several colors were selected and then I just started stamping on various papers. Guess what happened? A few ideas came to mind. So I’m sharing two simple cards using the Enjoy The Moment stamp set.
Details:
- For the “a little note” card on the left, a card base is created using Early Espresso cardstock. Follow with a layer of Crumb Cake cardstock. To the Crumb Cake layer, add a piece of In Good Taste Designer Series Paper. Stamp the image onto a strip of Crumb Cake cardstock (1-3/4″ x 5″) using Soft Suede Classic Ink Pad. Stamp the sentiment below the image. To add a touch of sparkle, color the pods using clear Wink of Stella (unfortunately, it doesn’t show in photo) Attach the strip to the card front using Stampin’ Dimensionals. Complete the card by adding a double Linen Thread bow.
- Now, for a super simple card! Create a card base using Soft Suede cardstock. Create background by randomly stamping the dual seed pods onto the cardstock using Soft Suede Classic Ink. Next, use the “seed” stamp to add seeds on the card base. Stamp the sentiment and the dual seed pods onto a 3″ x 3″ piece of Very Vanilla cardstock. Cut using the 2nd largest circle die from the Stitched Shapes Dies. Tie a piece of the Vanilla Open-Weave Ribbon (from the Forever Greenery Trim Combo Pack) around the card front and tie into a bow. Add the sentiment label next to the bow using Stampin’ Dimensionals.
Both of these cards are simple to make which are perfect for highlighting the Enjoy The Moment Stamp Set. Other ideas came to mind when making these cards so look for more projects soon highlighting this stamp set.
Reminders:
It’s time to Sale-A-Brate!!! What is that you ask? Sale-A-Bration is one of our biggest promotions of the year. During Sale-A-Bration you can earn FREE products with qualifying purchases. The FREE products are in the Sale-A-Bration Brochure. Click here to Shop With Me and view the online Sale-A-Bration brochure under the Sales and Specials tab.
As an added bonus – if you JOIN and become a demonstrator during Sale-A-Bration, you will receive a free stack of our Regals, Subtles, Neutrals, Brights, and 2020—2022 In Color Designer Series Paper along with your Starter Kit! There couldn’t be a better time to join the Stampin’ Up! family.
Sale-A-Bration is ongoing until February 28, 2021.
Margaret’s Customer Loyalty Program: Download the form (2020-2021 Customer Loyalty Form) for program details and start tracking your orders. And for orders over $150, you’ll also receive rewards from Stampin’ Up! Thank you for placing your order with me. You can order by clicking this link: Margaret’s Online Store. I sincerely appreciate your orders.
Happy crafting!

Project Materials:
The current host code is: Z7RKF3MX. Please use this code if your order is $150 or less (before shipping & taxes). Remember, if your order is over $150, you will receive the host rewards.
Nov 16, 2020 | August-December 2020 Mini Catalog, Christmas, In The Pines, Quick & Easy, Simple Stamping |
Today’s card, In the Pines Season’s Greetings, is a simple stamping card that can be assembled quickly. The In The Pines Bundle contains the In the Pines Stamp Set and the Pine Woods Dies providing a variety of products for your creations. Not only is the bundle appropriate for holiday cards, it is great to use for nature inspired card themes.

Materials:
- In the Pines Bundle
- Shaded Spruce cardstock: 4-1/4” x 11” – score at 5-1/2” and fold for card base; 4” x 5-1/4” (layer 1)
- Whisper White cardstock: 4-3/8” x 3-1/8” (layer 2); 3-1/2” x 2-3/4” for tree oval; ½” x 3” for sentiment banner
- Classic Christmas 6” x 6” Designer Series Paper: Shaded Spruce design 4-1/4” x 3”
- Oval Layering Dies (2nd largest)
- Subtle 3D Embossing Folder
- Banner Pick A Punch
- Shaded Spruce Classic Ink Pad
- Gold Twine (from Wonder of the Season Ribbon Pack) – 8”
- Stampin’ Seal
- Stampin’ Dimensionals
- Glue Dots
Directions for the In The Pines Season’s Greetings card:
- Texture emboss the 5-1/4” x 4” Shaded Spruce cardstock using the Subtle 3D texture embossing folder. Attach to the card base front using strong adhesive.
- Layer the designer series paper atop the Whisper White cardstock. Attach to the texture embossed layer near the top of the embossed piece – leave room to add the sentiment banner.
- Select pine tree die from the Pine Woods Dies and cut pine from Whisper White cardstock. Die cut tree in the center of the oval. Attach to designer series paper using Stampin’ Dimensionals.
- Stamp sentiment onto strip of Whisper White cardstock using Shaded Spruce Classic Ink Pad. Punch ends to create banner. Attach to card using dimensionals.
- Embellish tree trunk at base with a gold twine bow (attach with glue dot).
Using this basic design, you can change the colors, switch the pattern of designer series paper to create an entirely different look. I’ll be sharing more cards using the In The Pines Bundle so be sure to follow my blog.
Reminders:

Curvy Celebrations is underway! The Quite Curvy Variety Bundle is now available for you to order. Click here to view the products available.
Beary Comforting Paper Pumpkin Kit – Available for ordering through December 10. Detail and ordering – click here.

Margaret’s Customer Loyalty Program: Download the form (2020-2021 Customer Loyalty Form) for program details and start tracking your orders. Plus for your orders over $150, you’ll also receive rewards from Stampin’ Up! Thank you for placing your order with me. You can order Project Materials at the bottom of the post or click here to visit my Online Store. I sincerely appreciate your orders.
Thanks for stopping by! Happy crafting…
Project Materials:
The current host code is: CJSBNX7Z. Please use this code if your order is $150 or less (before shipping & taxes). Remember, if your order is over $150, you will receive the host rewards.
Oct 28, 2020 | August-December 2020 Mini Catalog, Banner Year Stamp Set, Bundles, Halloween, Little Treats, Quick & Easy, Simple Stamping, Treat Holders, Uncategorized |
The countdown is on to Halloween! Do you need a quick and easy treat idea? I’ve got it for you! It’s been a busy week with events so I decided to make a last minute Halloween treat for friends. A favorite treat in our household is Harvest Mix which is a combination of Chex, bugles, pretzels enrobed in a sauce with candies added. Click here for the Harvest Snack Mix Recipe.
Of course, the snack mix needs packaging. The Mosaic Gusseted Cellophane Bags are the perfect for holding one heaping cup of the mix. After adding the mix, fold over approximately one inch of the top edge. Use a hole punch to punch two holes and run ribbon through to tie the bags closed. For an added touch, tags are created using the Banner Year Stamp Set and the Little Treats Bundle. Super simple!

You still have a couple of days until Halloween so there’s time to prepare the Harvest Snack Mix. It makes lots so you’ll have plenty for gifting and for enjoying yourself! Drop me a comment and let me know if you try the recipe.
Reminders:
To celebrate the beginning of the new Stampin’ Up! business year, I am launching a Customer Loyalty Program. Download the form (2020-2021 Customer Loyalty Form) for program details and start tracking your orders. Plus for your orders over $150, you’ll also receive rewards from Stampin’ Up! Thank you for placing your order with me. I sincerely appreciate your orders.
Oh, don’t forget about the Designer Series Paper Sale. It is ongoing through the end of October. During this incredible sale, you can save 15% on select Designer Series Papers from current Stampin’ Up! catalogs. So, you’ll want to stock up on your favorites. Just click here to see the beautiful papers on sale.
The October 3D Tutorial Bundle is available! This month the projects feature fall themed projects.

Would you like the Tutorial Bundle?
You have several ways of receiving the 3D Tutorial Bundle:
1. Order $50 (before taxes and shipping) from my online store between now and November 10, 2020 and you’ll get the PDF for FREE.
2. Purchase the October 3D Tutorial Bundle PDF (a total of 6 tutorials) for $15.00. This is a one-time purchase. Simply drop me an email at [email protected] and I will send you a PayPal Invoice. Upon receipt of payment, I will send you the tutorial bundle.
3. Join my Playtime with Paper team! Team members always receive the tutorials for FREE!
Thanks for stopping by! Happy crafting…
Project Materials:
The host code for October is: YZ64N9SM. Please use this code if your order is $150 or less (before shipping & taxes). If your order is over $150, you will receive the host rewards.
Oct 5, 2020 | 2020-2021 Annual Catalog, Cards, Designer Series Paper, Ornate Garden, Quadrangle Cut, Simple Stamping, Technique, Thinking of You, Uncategorized |
Today I am sharing a fun quadrangle card. In last month’s card class, participants were able to assemble this fun style of card. Okay, I know the question – what is a quadrangle? A quadrangle is simply a shape with four angles. Using a quadrangle on a card front adds interest and a different style of focal point. It’s not a difficult technique and your geometry teacher will be proud of you (LOL). Best of all, when creating a quadrangle from your cardstock or designer series paper you will have four equal pieces cut for cardmaking. So, it’s great when you want to make multiple cards of the same design.

To create a quadrangle: start with a square piece of cardstock or designer series paper. Mark the same distance on all four sides of the square. Then cut from one mark to the opposite mark on the other side of the paper. After cutting, you will have four quadrangles the same size.
For this card: a 6″ x 6″ square of Bumblebee cardstock at 1-1/2″ on all four sides. It is then cut from one mark to the opposite mark on all sides. For the smaller designer series paper quadrangle, a 5-1/4″ piece of designer series paper is being used and marked at 1-1/4″ on the four sides.

After cutting, you will have four equal pieces:

Materials & Assembly Directions:
- Create a card base using Early Espresso Cardstock (5-1/2” x 8-1/2”, score at 4-1/4”.)
- Texture emboss the Mint Macaron cardstock (5-1/4″ x 4″) using the Tasteful Textile Embossing Folder. Attach to the Early Espresso card base.
- Layer the Ornate Garden Designer Series Paper to the Bumblebee cardstock angle and adhere to the Mint Macaron layer.
- Select the sentiment from the A Wish for Everything Stamp Set. Then, stamp the sentiment onto a 2-1/4″ x 2-1/4″ piece of Whisper White cardstock using the Early Espresso and Bumblebee Classic Ink Pads. Use the 2″ circle punch to cut and use Stampin’ Dimensionals to add to the card front.
- Embellish with a bow using the 3/8” Embroidered Ribbon.
Reminders:
To celebrate the beginning of the new Stampin’ Up! business year, I am launching a Customer Loyalty Program. Download the form (2020-2021 Customer Loyalty Form} for program details and start tracking your orders. Plus for your orders over $150, you’ll also receive rewards from Stampin’ Up!
Place your order here.
The Designer Series Paper Sale is ongoing through the end of October. During this incredible sale, you can save 15% on select Designer Series Papers from current Stampin’ Up! catalogs. You’ll want to stock up on your favorites. Click here to see the beautiful papers on sale.
The October 3D Tutorial Bundle is available! This month the projects feature fall themed projects.
Would you like the Tutorial Bundle?
You have several ways of receiving the 3D Tutorial Bundle:
1. Order $50 (before taxes and shipping) from my online store between now and November 10, 2020 and you’ll get the PDF for FREE.
2. Purchase the October 3D Tutorial Bundle PDF (a total of 6 tutorials) for $15.00. This is a one-time purchase. Simply drop me an email at [email protected] and I will send you a PayPal Invoice. Upon receipt of payment, I will send you the tutorial bundle.
3. Join my Playtime with Paper team! Team members always receive the tutorials for FREE!
Thanks for stopping by!
Happy crafting…

Project Materials:
The host code for October is: YZ64N9SM. Please use this code if your order is $150 or less (before shipping & taxes). If your order is over $150, you will receive the host rewards.
Sep 23, 2020 | 2020-2021 Annual Catalog, August-December 2020 Mini Catalog, Cards, Designer Series Paper, Holiday, Magic In This Night, Simple Stamping, Uncategorized |
When designing cards for the recent To-Go class, the Magic in This Night Designer Series Paper was front and center on two card designs. It is not just for Halloween but can be used for various occasions. For the card in class, it is featured on a Thanksgiving Wishes card. While several of the designs in the designer series paper are Halloween themed, most are generic designs. On today’s card, the Pretty Peacock design offers a beautiful background. It coordinates wonderfully with silver foil texture embossed elements.

Materials:
- Pretty Peacock card base: 5-1/2” x 8-1/2”, score at 4-1/4”; 1-1/2” x 1-1/2” for leaf
- Whisper White: 4” x 5-1/4” (for Layer 1); 1-1/4” x 2-1/4” (for sentiment)
- Magic in This Night Designer Series Paper: 5” x 3-3/4”
- Silver Foil Sheets: 3-1/2” x 2-1/2”
- Stamp Set
- A Wish for Everything Stamp Set
- Pretty Peacock Classic Stampin’ Pad
- Dies:
- Gathered Leaves
- Stitched Shapes
• Embellishment: 1-1/2” Metallic Mesh Ribbon (approx. 8”)
• Stampin’ Seal, Stampin’ Dimensionals & Glue Dots
To assemble the card, attach the Whisper White cardstock and the Magic in This Night Designer Series Paper to the card base using Stampin’ Seal. With the small, veined leaves dies from the Gathered Leaves Dies, cut two leaves from the Silver Foil Sheet and one leaf from the Pretty Peacock scrap. Next, stamp the sentiment onto the Whisper White using Pretty Peacock Classic Stampin’ Pad and add to card with Stampin’ Dimensionals. Then, add the cut embossed leaves to the label and card using Stampin’ Dimensionals and glue dots to adhere. Complete the card by adding a Metallic Mesh Ribbon bow to card.
Be sure to look at both sides of your Designer Series Papers when designing cards. Often, themed papers offer prints that are appropriate to use for other occasions. Remember, Magic in This Night is not just for Halloween!
Reminders:
The September 3D Tutorial Bundle is available! This month the projects are focusing on Halloween.

Would you like the Tutorial Bundle?
You have several ways of receiving the 3D Tutorial Bundle:
1. Order $50 (before taxes and shipping) from my online store between now and September 30, 2020 and you’ll get the PDF for FREE.
2. Purchase the September 3D Tutorial Bundle PDF (a total of 6 tutorials) for $15.00. This is a one-time purchase. Simply drop me an email at [email protected] and I will send you a PayPal Invoice. Upon receipt of payment, I will send you the tutorial bundle.
3. Join my Playtime with Paper team! Team members always receive the tutorials for FREE! September is a great time to join – Stampin’ Up! is offering the “Get & Go Starter Kit Promotion”. In addition to the regular Starter Kit ($99), you’ll receive enough cardstock pieces to make 16 cards, a pack of Rhinestone Basic Jewels, the So Much Love stamp set, and the Queen Anne’s Lace stamp set. Contact me for more details.
Thanks for stopping by today. Hopefully, I’ve inspired you to get creative! Below you will find a list of the project materials used for today’s project. To order the supplies, you can click on the item in Project Materials or download the Supply List and go to my store to by clicking here. (you’ll know you’re shopping with me if you see my name on the upper, left side of the page) Your order is greatly appreciated.
Happy crafting…
Project Materials:
Aug 10, 2020 | 2020-2021 Annual Catalog, Cards, Designer Series Paper, Flowers for Every Season, Quick & Easy, Simple Stamping, Uncategorized |
The project today is a triple panel floral card. When I need to make multiple cards of one design, I like to use panels of repeat designs. The repeat designs can either be stamped images or designer series paper images. So for this card, the Flowers For Every Season Designer Series Paper provides the repeat floral design. Notice the texture? Each of the panels is texture embossed using the Subtle 3D embossing folder.

Recreating the card:
- Create a card base using Poppy Parade cardstock cut 5-1/2″ x 8-1/2″. Score and fold at 4-1/4″.
- Cut 3 strips of Just Jade cardstock: 4″ x 1-11/16″.
- Cut 3 strips of the Flowers for Everything Designer Series Paper: 3-7/8″ x 1-9/16″.
- Attach the designer series paper to the Just Jade cardstock strips. Then, texture embellish using the Subtle 3D Embossing Folder.
- Evenly space the layered strips onto the card base front and attach using Stampin’ Seal Adhesive.
- Stamp the sentiment from the Meant to Be Stamp Set onto a 2-1/2″ x 1-1/2″ piece of Whisper White cardstock. Then cut using the Stitched Shapes Dies (2nd smallest oval).
- Using the 2nd largest oval from the Stitched Shapes Dies, cut a 3-1/4″ x 2-1/4″ piece of Just Jade cardstock. Next, add the sentiment label using Stampin’ Seal.
- Add the layered sentiment label to the card front using Stampin’ Dimensionals.
- Embellish with the Crushed Curry resin dots from the Playing with Patterns Resin Dots. Then add a Just Jade Ribbon bow.
You can use the triple panel card design for portrait or landscape cards. Plus, adjusting your sentiment label and adding a few more embellishments enables you many design possibilities.
Reminders:
Be sure to check out the new Online Store by clicking here. When viewing the new Online Store, be sure to check in the upper left hand corner for the Shopping With notice. You should see my name listed. Don’t forget if you earned $5 Bonus Days coupon codes last month, August is the month to use them!
The August 3D Tutorial Bundle is available! This month it features the Nothing’s Better Than product bundle.

Would you like the Tutorial Bundle?
You have several ways of receiving the 3D Tutorial Bundle:
1. Order $50 (before taxes and shipping) from my online store from now – August 31, 2020 and you’ll get the PDF for FREE.
2. Purchase the August 3D Tutorial Bundle PDF (a total of 6 tutorials) for $15.00. This is a one-time purchase. Simply drop me an email at [email protected] so I can send you a PayPal Invoice. Upon receipt of payment, I will send you the tutorial bundle.
3. Join my Playtime with Paper team! Team members always receive the tutorials for FREE!
Thanks for stopping by today! Happy crafting…
Project Materials:
The host code for August is: JUU2YA39. Please use this code if your order is $150 or less (before shipping & taxes). If your order is over $150, you will receive the host rewards.


