Looking for a cute birthday card? Look no further! The Turtle-y Cute Suite of products from the Stampin’ Up! Annual Catalog provides everything needed to create a fun birthday card, especially for a youngster (or a youngster at heart! Best of all, you can use the Turtle-y Awesome Dies to cut images needed from the Turtle-y Cute Designer Series Paper – making it easy to create the Turtle-y Cute birthday card. The designer series paper contains many fun images and background designs to use for a variety of projects. The fun background layer of the card uses two-tone cardstock, which is embossed with the Turtle Texture Embossing Folder and the raised areas sanded. And one thing to add to your shopping list is the Shades of Green Hexagons – the embellishments are gorgeous! You’ll find an assembly video below the photo so you can recreate this card or use it as inspiration for your own design.
Assembly Video for the Turtle-y Cute Birthday Card
Today’s card inspiration features the beautiful Mixed Media Florals Suite. The suite is an Online Exclusive offered by Stampin’ Up! Products in the suite consist of two stamp bundles, Designer Series Paper (DSP), a 3-D embossing folder, and embellishments. The beautiful inspiration card below uses most of the products in the suite and is one of four cards from the February 2025 class featuring the Mixed Media Florals Product Suite.
Want to create this card? The assembly video, cut dimensions and product materials list are below to help you.
Cut Dimensions:
Petal Pink cardstock: 4 1/4″ x 11″ (score/fold at 5 1/2″ for card base)
Granny Apple Green cardstock: 4 1/8″ x 5 3/8″ (2 pieces – layering panels); 5″ x 4″ (die cut – place die on angle)
Basic White: 4″ x 5 1/4″ (2 pieces)
Basic White Thick: 3 1/2″ x 5 1/4″ (stamping/die cut)
On March 1, more cards from the class featuring the Mixed Media Florals Suite will be shared. The post will include not one but two cards! Be sure to subscribe so you are notified when it’s available.
Reminder:
Sale-a-bration ends on February 28! Earn FREE products with purchases of $60 or more. Learn more and view FREE products here.
Today’s post features a hello greeting card using the Citrus Blooms Bundle and the Mediterranean Blooms Designer Series Paper from the 2024-2025 Annual Catalog from Stampin’ Up! This is one of the July card class projects from the “Flowers & Blooms” class. All cards contain flowers or flower blooms.
This card highlights the beautiful Mediterranean Blooms designer series paper. The oranges and orange blossoms from the designer paper have a coordinating die. I just love it when there’s a die to cut beautiful images!
Notice the layering panel highlighting the citrus and blooms. A double cut using the Citrus Blooms die creates a smaller panel. The technique to create the top layering panel is shown in the assembly video.
Assembly Video for Citrus Blooms Hello Card
Cut Dimensions:
Night of Navy Cardstock – 5 1/2″ x 8 1/2″; score/fold at 4 1/4″ for card base; optional 1/4″ x 2″ strip for additional sentiment
Mediterranean Blooms Designer Series Paper: Navy Piece 5 1/4″ x 4″; stem of 3 oranges for die cut
Mossy Meadow Cardstock – scrap to die cut leaves
Basic White Cardstock – (2 pieces) 4″ x 5 1/4″
Reminders:
Class To Go Options are available. The theme for August is “WOW” cards. The cards are four different fun fold designs using different stamp bundles. The bundles are Changing Leaves, Iconic Imagery, Season of Green & Gold and Latte Love. Information can be found here.
Next week, I’ll share another of the Flowers & Bloom cards.
It’s been a month since last posting! Where has time gone? Even though I haven’t taken the time to post, it doesn’t mean that I’ve not been crafting. Actually, I’ve been spending more time crafting than doing lots of other things. So today, I decided it was “computer time” and I’ve been busy outlining my posts for the next few weeks.
Now on to today’s card! It’s a book fold card featuring the Perennial Lavender Product Suite. The product suite features two stamp/die bundles – Perennial Postage and Painted Lavender. In addition, the suite features the Perennial Lavender Designer Series Paper and two different embellishments. For the February monthly card class, the cards all featured products from the suite. In addition, word sentiments from the Thoughtful Moments Hybrid Embossing Folder was incorporated on several of the projects. In the assembly video below, I also demonstrate how to use the hybrid embossing folder along with recreating the card.
Cut Dimensions for the Perennial Lavender Book Fold Card:
Starry Sky Cardstock: 4-1/4″ x 11″, score at 5-1/2″ & 6-3/4″; scrap piece for behind sentiment
Basic White Cardstock: (2 pcs) 4-1/8″ x 4-1/8″; 1-1/8″ x 4-1/8″
Perennial Lavender Designer Series Paper: 1″ x 4″; 4″ x 4″
Lost Lagoon and Highland Heather Cardstocks: scrap pieces for die cuts
For the Thoughtful Moments Hybrid Embossing Folder: Basic White Cardstock: 6″ x 6″
Assembly Video and Demonstration on using the Thoughtful Moments Hybrid Embossing Folder
The February class features four different cards using the Perennial Lavender Product Suite. The additional cards are scheduled to post over the next several weeks (I promise! the posts are already completed!!!). So, be sure to subscribe so you don’t miss out on the various cards designed using this gorgeous product suite.
Margaret’s Customer Loyalty Program:
Thank you for shopping with me. Be sure to track your orders on my Customer Loyalty form.
Download the form (Customer Loyalty Form) for program details and start tracking your orders. Just a reminder: for orders over $150 you’ll also receive rewards from Stampin’ Up! You can order by clicking this link: Margaret’s Online Store. (please confirm that it says you’re shopping with Margaret Knight) Again, thank you for placing your order with me. I truly appreciate your business.
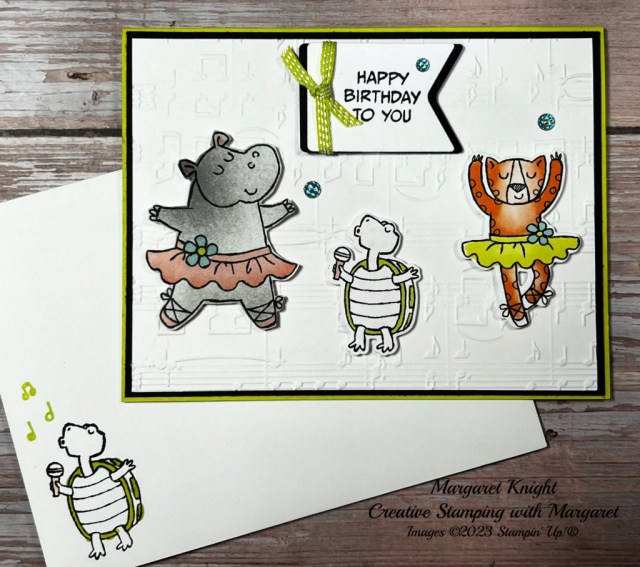
Can you believe it’s August! I know time seems to be flying by. Even though it’s August, I’m still sharing cards from the July card class featuring the Zany Zoo Bundle. This week’s card is a Zany Zoo Birthday Card. The whimsical card is appropriate for all ages but would be especially good for those hard to create preteen/teen cards. At least, for me those are the ages that challenge me when cardmaking. As in my last post featuring the Zany Zoo Bundle, the coordinating Zoo Crew Designer Series Paper is used for the characters. And since the turtle has the microphone (singing Happy Birthday), the Merry Melody 3D embossing folder creates a perfect base for the singer and his dancers. Below you’ll find cut dimensions and a video to help you recreate this fun card.
It’s A Zany Zoo Birthday Card Cut Dimensions:
Lemon Lime Twist Cardstock: 8-1/2″ x 5-1/2″ (score/fold at 4-1/4″ for card base)
Basic Black Cardstock: 5-3/8″ x 4-1/8″ (layering panel); scrap (die cut)
Basic White Cardstock: (2) 5-1/4″ x 4″ (embossing & card interior); scrap (sentiment)
Zoo Crew Designer Series Paper: fussy cutting & die cutting
Assembly Video
The fun characters on this card make me smile!
If you’d like to know when you projects are posted, be sure to subscribe to my blog so you don’t miss out. In addition, register for my newsletter – each month a FREE project tutorial is available for you to download.
August Card Class: Kit To-Go Option Available
The August class is featuring Fun Folds and will use the following stamp bundles:
Little Monkey
Seaside Bay
Trucking Along
Inked & Tiled
In addition to being offered in person, a “to-go” kit is available to craft at home. Details & registration can be found here. Register soon – deadline is August 7!
Speaking of kits – during the month of August, Stampin’ Up! is offering all kits in the Kits Collection (does not include Paper Pumpkin) at a discount of up to 30%.
This is a great time to order kits for yourself or to give as gifts. Everything needed to create the kit is included in the box. You can see all the kits in the Kits Collection by following this link.
Margaret’s Customer Loyalty Program:
Thank you for shopping with me. Be sure to track your orders on my Customer Loyalty form.
Download the form (Customer Loyalty Form) for program details and start tracking your orders. Just a reminder: for orders over $150 you’ll also receive rewards from Stampin’ Up! You can order by clicking this link: Margaret’s Online Store. (please confirm that it says you’re shopping with Margaret Knight) Again, thank you for placing your order with me. I truly appreciate your business.
Thanks for stopping by. Happy crafting and enjoy the weekend!
The content in this blog is the sole responsibility of Margaret Knight as an Independent Stampin’ Up!® Demonstrator. The use of and content of classes, services or products offered is not endorsed by Stampin’ Up!®


