Aug 29, 2018 | Christmas, Color Your Season |

You have limited coloring time left, so make sure to take advantage of this great promotion while you can before it’s over at the end of the month (just 2 days away!). The products will be available through August 31st, or while supplies last. Whichever comes first. Even though the stamp sets can be used all year round, I’m partial to the holiday season. You can also do so much with them. Just visit my online store to get any of the products included in the bundle. Remember, you can order them individually as another option as well. Take a look below at the products in the Color Your Season bundle and see for yourself. Because you can also take advantage of Bonus Days this month, it’s a win, win.

Limited Coloring Time for these great products. The promotion is over on August 31st.

Here is everything that is included in the promotion:
~Blended Seasons Stamp Set, an exclusive 10-piece wood- or clear-mount stamp set with images for every season!
~Stitched Season Framelits Dies, a coordinating stitched die that includes stitching on both the positive and negative images!
~Watercolor Pencils in 10 new colors!
Coloring is Easy
These products also make it easy to create beautiful cards. The new assortment of Watercolor Pencils allows you to expand your coloring options and style. We have so many great techniques you can use with these stamps. As a result, in just a short time, you will create cards with this bundle that can be used for all seasons and look different each time.
Therefore, don’t hesitate, order yours before they are gone!
Quick Links:
Check out the products in the Color Your Season promotion
Shop the Clearance Rack
Download the Annual Catalog
Sign Up for my Newsletter
Shop my online store anytime
Contact Me
Thanks for stopping by and happy stamping!

Aug 28, 2018 | 2018 Holiday Catalog, Boxes, Cards, Country Lane Suite, Mini Gable Box, Uncategorized |
Some of you joined me for a Facebook Live presentation last week showcasing the Country Lane Suite that is in the 2018 Holiday Catalog. While ordering is not available until next week, I am posting the information on the card materials and the Mini Gable Treat Box showcased during the presentation.

Project materials are as follows:
- Card base – Crushed Curry Cardstock: 4-1/4″ x 11″ scored at 5-1/2″ to create a top fold card base
- Country Lane Designer Series Paper (DSP): 5-1/4″ x 4″
- Blackberry Bliss Cardstock: cut 5-1/8″ x 3-7/8″
- Whisper White Cardstock: 5-1/2″ x 4″ (for inside of card, trim after completing card front and stamping the image to ensure you are able to center the image in the oval); 3-1/4″ x 3/4″ for sentiment
- Country Home Stamp Set,
- Layering Ovals Framelits
- Classic Stampin’ Ink: Mint Macaron, Blackberry Bliss
- Stampin’ Blends: Light Mint Macaron, Cajun Craze Light & Dark, Dark Daffodil Delight, Old Olive Light & Dark, Blackberry Bliss Light & Dark
- 3/16″ Braided Linen Trim
- Adhesives: Snail, Stampin’ Dimensionals, Mini Glue Dots
- Tools: Big Shot, Paper Snips
- Other: Cotton Swabs
I am also sharing another method for cutting the ovals versus the method demonstrated via the Facebook Live presentation. Both methods work equally well.


Embellished Mini Gable Box
A favorite project from the Facebook Live presentation is stamping an image from the Country Home Stamp set onto a Lustrous White Mini Gable Box (it’s also a funny portion of the presentation as I drew a blank on the name of the box!) Yes, we must laugh at ourselves! On to the project details, using Early Espresso Classic Stampin’ Pad stamp the desired image onto the side of the box. Next, sponge Balmy Blue Classic Ink around the floral bouquet image prior to coloring with a variety of Stampin’ Blends. Stamp a tag with Blackberry Bliss and cut using the 1″ circle punch. Use the 1-1/4″ circle punch to cut a scrap of Crumb Cake for the tag base. Further embellish with a folded strip of 1/4″ Rich Razzleberry Velvet Ribbon.

Thanks for stopping by. Remember the Country Home Suite of products will not be available until September 5 but add it to your must have list!
Quick Links:
Check out the products in the Color Your Season promotion
Shop the Clearance Rack
Download the Annual Catalog
Sign Up for my Newsletter
Shop my online store anytime
Contact Me

Aug 27, 2018 | 2018-2019 Annual Catalog, CASE The Catalog, Designer Series Paper, Uncategorized |
For this week’s CASE the Catalog, I selected the You Made My Day card on Page 36 of the Annual Catalog. The card uses the Best Bunny Bundle which includes the Best Bunny photopolymer stamp set and the coordinating Bunny Builder Punch. This week, I did not alter the card but made it as shown in the catalog. The Best Bunny stamp set is one that can be used for a variety of occasions and as in this case, it’s perfect to send someone letting them know how special they made the day! Details and tips for making the card are below the photo.
Made My Day with these details for recreating the card:
- Thick Whisper White: 5 1/2″ x 8 1/2″ scored at 4 1/4″ to create card base.
- Broadway Bound Designer Series Paper (DSP): Dotted DSP 5 1/2′ x 4 1/4″ for base card front;. gold & black strip 3/4″ x 4″
- Gray Granite: 4 1/2″ x 3 1/2″
- Shimmery White: 4″ x 3″
- Scraps of Whisper White for stamping bunny face, sentiment and hat using Tuxedo Black Memento Ink.
- Scrap of Basic Black. Use the Tailored Tag Punch to cut as shown in photo below:

- Use Bunny Builder Punch and cut the bunny face, color the ears using Light Petal Pink Stampin’ Blends. Color tophat using Dark Smoky Slate Stampin’ Blends and fussy cut. Layer the bunny face behind the top hat using a mini glue dot.
- To create the background for the bunny and sentiment, add a light layer of water diagonally across the Shimmery White cardstock and sprinkle with Yellow Brusho. I used an Aqua Painter to blend the Brusho with the water. After the Shimmery White layer has dried, randomly stamp stars using Crushed Curry Ink Pad.
- Using small Stitched Shapes circle framelit, cut the sentiment and layer onto circle of Gold Glimmer Paper cut using the 1 1/2″ circle punch.
- Assemble by attaching dotted DSP layer to Whisper White card base. Next attach and center the Granite Gray Cardstock layer using Snail Adhesive. Add the strip of gold/black stripe DSP and then attach the Shimmery White layer – be sure to offset toward the right of the Gray Granite layer as shown in the photo.
- Add the tag piece and the tophat with bunny.
- Finish the card by using 8″ of Gold Mini Sequin Trim to create a faux bow and using Stampin’ Dimensionals add the sentiment.
In Conclusion
Finally, the stamp set has various sentiments that can also be used with another stamp set. I’m smitten with the different face expressions included for creating bunnies with a variety of looks and images. It will be fun to create cards for all types of occasions and really can Make My Day.
I would love to hear from you so don’t forget to add comments!
Be sure to check back tomorrow for the project details on the Country Home Suite from last week’s Facebook Live.
Quick Links:
Check out the products in the Color Your Season promotion
Shop the Clearance Rack
Download the Annual Catalog
Sign Up for my Newsletter
Shop my online store anytime
Contact Me
Thanks for stopping by and happy stamping!
Project Materials:
Aug 24, 2018 | Cards, Floral, Wedding |
Glancing at Impressions is my way of exposing you to both our Abstract Impressions stamp set and our Springtime Impressions Thinlits. They coordinate together and both are amazing to work with. I have addressed this suite on another post and wanted to share a few more samples because it’s such a great combination.

Glancing at Impressions
So today I want to share these other samples below. This suite is so versatile because you can use it for a variety of occassions. The cards below all have different color palettes. Therefore, they represent various feelings from the sender. Allow your receipent to appreciate the card and the personal message it sends.


You can get the Sprintime Impressions Thinlits and the Abstract Impressions stamp set through my online store. Remember though, if you order both products together, you can take advantage of the 10% off bundle option. I love to save money whenever I can because it gives me more options for other products. It’s also almost the end of the month and you can still earn the $5 coupon for every $50 spent in August (before tax and shipping).
Quick Links:
Check out the products in the Color Your Season promotion
Shop the Clearance Rack
Download the Annual Catalog
Sign Up for my Newsletter
Shop my online store anytime
Contact Me
Thanks for stopping by and happy stamping!
Aug 23, 2018 | 2018-2019 Annual Catalog, Aqua Painter, Bonus Days, Cards, Floral |
You can create lovely cards with Pretty Varied Vases. So, today I would like to share some samples of the Varied Vases stamp set. I enjoy using this stamp set. The vases are so delicate looking and while they are not all solid colored, you can color them or since this is a two-step stamp set, use an ink pad to fill your flower and vase shapes with color. To achieve a lighter color, stamp off onto a scrap of paper. With all the options we have for coloring, it may even be a difficult choice. Each of the blending options can have a different outcome. Another quick trick, is to select your favorite DSP and stamp the outline of a vase. Use the Vases Builder Punch to cut the vase and voila, you have a designer vase!
Pretty Varied Vases

Just look at the size variations and also, how many flower options you have. You can add other sentiments if you would like to expand the possibilities for using the images as was done above. 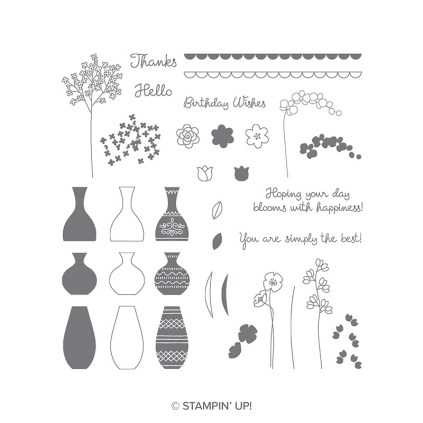
Because I have a soft spot for flowers, I’m drawn to this set and it’s amazing possibilities. Once I added the little flowers and soft colors, the project came together. Another useful product is the Vases Builder Punch which coordinates with the Varied Vases stamp set. It eliminates the need to fussy cut the vases and small flowers.

You can get both the Varied Vases stamp set and Vases Builder Punch through my online store. Pick up both products for 10% off because they are part of the Varied Vases Bundle. I love the bundles and how you can save money when you purchase them together. No matter if you pick up the bundle or the individual items, you won’t be disappointed.
Quick Links:
Check out the products in the Color Your Season promotion
Shop the Clearance Rack
Download the Annual Catalog
Sign Up for my Newsletter
Shop my online store anytime
Contact Me
Thanks for stopping by and happy stamping!


