Jun 14, 2013 | Uncategorized |
Hi all! Hope you’re having a good week. It’s been a busy week for me. The monthly card class was held on Monday and other commitments have kept me on the go. Last night and this morning, I was finally able to spend time crafting cards and card candy that I’ll use for convention swaps. Next week, I will share a “peek” at some of the swaps.
The card class was themed “All Occasion Cards” and participants were able to make a variety of cards to suit different occasions. One of the cards demonstrated and made was a “triple layer card” as shown below.
 |
| Triple Layer Card using Stampin’ Up! Mixed Bunch Stamp Set |
Next week, I’ll be sending the card to a friend celebrating her
birthday. She loves gardening and flowers so I wanted to make a card
reflecting her hobby.
Materials:
Pear Pizzazz Card Stock (item #131201)
Whisper White Card Stock (Item #100730)
Mixed Bunch Stamp Set
(Item #125537 clear, 128442 wood)
Itty Bitty Banners Stamp Set
(Item #126257 clear, 132022 wood)
Calypso Coral Classic Stampin’ Pad (Item #126983)
Daffodil Delight Classic Stampin’ Pad (Item #126944)
Pear Pizzazz Classic Stampin’ Pad (Item #131180)
Stampin’ Dimensionals (Item #104430)
Sticky Strip (Item #104294)
Rhinestone Basic Jewels (Item #119246)
Modern Label Punch (Item #119849)
Remember to check out the latest Stampin’ Up!
Promotions.
Three of the most popular Greeting Stamp Sets are 25% off until June 30th!
To place an order, click on the “Shop Now” tab or follow this
link.
Thanks for stopping by and be sure to check back next week!
Have a great weekend!
Jun 7, 2013 | Uncategorized |
What a week for the techno gremlins! They must have had loads of fun at my house. Last Saturday, the computer fan on my desktop computer stopped working so off to the shop it went. No big deal (or so I thought), I have my IPad so that should allow me to update my blog. Well, the techno gremlins decided that the recently installed “new and better” router would not communicate with the device preventing me from updating the blog. It was a case of “sometime it would work and sometime it would not” – yes, frustrating! A bit of humor about it does seem to help. Today, my desktop repair was completed and it’s running great so I’m “back in business.” Tomorrow, service technicians are scheduled to replace and/or reconfigure the router and modem again. Keeping my fingers crossed that all will be fixed and the techno gremlins will be on their merry way.
With sporadic internet access, I was able to spend a lot of time perusing the new 2013-2014 Stampin’ Up! catalog and selecting what new goodies to purchase. There are lots of beautiful stamp sets, new accessories and fun Designer Series Papers (DSP) to use for creating a variety of projects and I look forward to my order arriving soon. You can download the new catalog PDF from the blog sidebar or download Google Catalogs! It’s interactive, it’s easy—and it’s compatible with both iPad and Android tablets in the US.
To access the catalog:
-
Download the Google Catalog app (available through iTunes and Google Play).
- Sign
in using your Google or Gmail account. If you don’t have a Google
account, you can create one by tapping the sign up button in the app. - After you have signed in, search for “Stampin’ Up!”by tapping the small magnifying glass icon at the top of the screen.
- Open the catalog by tapping the cover.
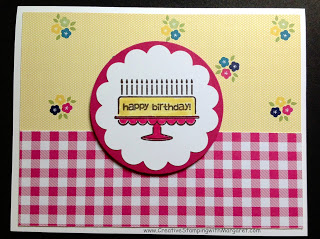
The card that I’m sharing uses the new Gingham Garden DSP. It’s a bright and colorful paper that is perfect for creating a cheerful birthday card.
 or or |
| Gingham Garden Birthday Card |
Materials and Tools:
Whisper White CS (item #100730)
Gingham Garden DSP (item #129310)
Melon Mambo CS (item #115320)
Early Espresso Classic Stampin’ Pad (item #126974)
Daffodil Delight Classic Stampin’ Pad (item # 126944)
Melon Mambo Classic Stampin’ Pad (item #126948)
Bring on the Cake Stamp Set (item #128490 Wood, item #121598 Clear)
2 3/8″ Scallop Circle Punch (item #118874)
2 1/2″ Circle Punch (item #120906)
Blender Pen (item #102845)
Snail Adhesive (item #104332)
Stampin’ Dimensionals (item #104430)
When my sister, Sharon, and her friend, Darien, visited a few weeks ago, we made fabric flower pins using the now retired, Summer Smooches and Floral District Flawless Fabric from Stampin’ Up! I wanted to share the photo as the pins turned out beautiful. The red center in one of the pins is a flower made using the new Simply Pressed Clay and the Buttons & Blossoms Simply Pressed Clay Mold. The clay was colored using the Real Red Classic Stampin’ Ink Refill.
 |
| Flower Pins |
Three of the most popular Greeting Stamp Sets are 25% off until June 30th!
The last day for 25% off of select My Digital Studio content is June 15th.
To place an order, click on the “Shop Now” tab or follow this
link.
Thanks for stopping by and be sure to check back next week for more project shares!
Until then, have a great weekend!
May 30, 2013 | Uncategorized |
Happy Thursday! Hope you are having a great week. We’re continuing to enjoy nice weather in Georgia, and fortunately, aren’t experiencing any of the severe weather that seems to be playing havoc on other parts of the country. Let’s pray that the weather patterns will soon shift so there will be calmer days ahead for everyone.
As mentioned earlier, “By the Tide” is rapidly becoming a favorite stamp set. A friend’s birthday is soon and I decided the stamp set would make a great card for him. Since he enjoys dining on lobster and spending time at the beach, the
stamp set allowed me to design a card incorporating a bit of both.
 |
| “By the Tide” stamp set (Images copyright of Stampin’ Up!) |
Materials:
Real Red (item #102482) and Very Vanilla card stock (item #101650)
By the Tide Stamp Set (item #129120 clear, #131910 wood)
Real Red Classic Stampin’ Pad (item #126949)
Soft Sky Classic Stampin’ Pad (item #131181- new color!)
Early Espresso Classic Stampin’ Pad (item #126974)
Express Yourself Stamp Set (new Hostess set) (item #130339 clear, #130336 wood)
Ordering from the new catalog starts tomorrow, May 31st at noon MDT (or 2:00 EST)!!!
Below are a few more items from the three days of crafting with Sharon and Darien.
Like myself, Darien enjoys using the “By the Tide” stamp set and created this beautiful card.
 |
| By the Tide stamp set (Stampin’ Up!) |
Darien prepared tags to use for her daughter’s wedding favors.
 |
| Tags using the new Label Love stamp set and Artisan Label Punch | | | |
Preparing for a holiday themed convention swap, Sharon prepared this beautiful card sample. She’ll be making twenty+ to share with fellow stampers! On the two evergreen silhouettes, she stamped with Old Olive Classic Stampin’ Pad and then re-stamped the image with Illuminate Glitter Watermark Stampin’ Pad. It provides a nice shimmer but it does not show in the photo.
 |
| Evergreen stamp set (images copyright of Stampin’ Up!) |
To place an order, click on the “Shop Now” tab.
Thanks for stopping by and be sure to check back on Monday for another project!
Until then, have a great weekend!
May 28, 2013 | Uncategorized |
Hope your Memorial Weekend was spent just as you planned! My son and grandson visited for a couple of days so we stayed busy. The weather was perfect so lots of time was spent outdoors enjoying a variety of activities. Of course, the highlight for my grandson was the three snakes that decided to slither through the yard! Fortunately, the snakes decided there was too much to bother them at our house and made their way back to the woods. Ah, the joys of living in rural Georgia!
Today I am sharing another Father’s Day card and a few more items from last week’s craft marathon. The “By The Tide” stamp set from Stampin’ Up! was used for the card. At first, I did not think that the stamp set would be one that would be utilized often but I am finding that beautiful cards are produced using the set.
 |
| Father’s Day Card using “By The Tide” from Stampin’ Up! |
The card base is Pool Party CS and the first layer is Very Vanilla CS. The coral was stamped using Pool Party Classic Stampin’ Pad and then VersaMark was used to stamp over the coral again. Iridescent Ice Stampin’ Emboss Powder was applied and heat embossed to add shimmer to the coral. Pearl Basic Jewels were used to embellish the coral. The fish were stamped using Old Olive Classic Stampin’ Pad. You’ll note that the fish in the foreground of the card is darker, it was stamped first. The fish in the upper left corner was stamped without re-inking the stamp to produce a lighter image and stamped so that part of the fish fades into the coral. Before stamping the lighter image, I “huffed” on the stamp to moisten the remaining ink on the stamp. The greeting was stamped using Early Espresso Classic Stampin’ Pad and a saying from the Delightful Dozen stamp set. A Stampin’ Write Marker in Pool Party was used to color the word in the greeting.
As noted in an earlier post, last week lots of crafting was done by Sharon, Darien and me. Below are a couple more of the items made.
The cluster of cards were prepared by Darien and though it did not photograph very well, the Swallowtail butterfly card is beautiful. She stamped it using Early Espresso Classic Stampin’ Pad and then re-stamped with VersaMark to heat emboss with Iridescent Ice Emboss Powder.
Sharon made the card below using the large flower from Betsy’s Blossoms stamp set and the Blossoms Flower Punch. The card has a very clean appearance and the overlapping blossoms are attached with Stampin’ Dimensionals to add depth and dimension.
There are still more items to come from last week and I hope to complete posting them this week. Additionally, card kits for purchase are in the planning stages so stay tuned for more information.
Thanks for stopping by and be sure to check in on Thursday for my next post!
Until then, have a great week!
May 24, 2013 | Uncategorized |
The past three days were a blast! In addition to working on various card designs, Sharon, Darien and I spent lots of time laughing and having “rip, roaring fun!” Wednesday was an early night – we made it to bed around 2:30 a.m. It brought back memories of high school slumber parties. It’s been dubbed our “Crafting Slumber Party” though crafting marathon is a better name! Plans for the next one have already begun.
It will take several days for me to recoup and I’ll be editing the photos of our projects to post in the future. A couple are ready for sharing today. The first is a card for a friend’s birthday next week. She loves clothes shopping and we all joke that “it’s all about her” so the card seems appropriate.
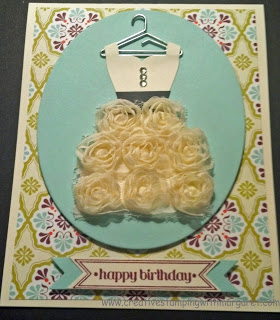 |
| “All Dressed Up” |
 |
| Inside greeting |
The inside greeting is a “Sneak Peek” and is from the Really Good Greetings stamp set. It will be available to order on May 31st. The card front was prepared using the “Dress Up” Framelit Dies (item #130101) and the Ovals Collection Framelit Dies Set (item #129381). The hanger from the “Hung Up” Cute Clips (item #129389) was used and the dress was embellished using the 5/8″ Flower Trim (item #126869) and Rhinestone Basic Jewels (item #119246).
Darien’s daughter is recently engaged so she worked on a variety items to use for announcements, invitations and gift tags. The card below was prepared to use for an announcement. The Dress Up Framelit Dies Set was used and she texture embossed the dress.
 |
| Bride and Groom Card |
Isn’t the card beautiful?
More of her crafts will be shared in a future post.
Thanks for stopping by and be sure to check back again to see more of our projects.
You can register via “Follow Me” to receive notification of when I have posted.
Until next week, have a safe and fun Memorial Weekend!
May 21, 2013 | Uncategorized |
As mentioned in my last blog, my sister and her friend are visiting this week. It’s been a busy day. My sister and I will be attending the Stampin’ Up! convention in July so we making the swaps that will be traded with other demonstrators. This morning was spent brainstorming and by mid-afternoon, we were finally ready to start crafting some of our ideas. Can you imagine – three women, two Big Shot die-cutting machines, card stock, stamps, inks and more – guess what my kitchen counters and dining table look like? Our creative juices are flowing and we’re energized…it’s going to be a late night!
Though Father’s Day is a month away, I am thinking ahead so
sharing a Father’s Day card. The card uses a Stampin’ Up! classic
stamp set – “
Lovely As a Tree“.
 |
| Father’s Day Card |
Card Materials and Tools:
Crumb Cake card stock (CS) – Item #102128
Very Vanilla CS – Item #101650
Lovely A a Tree Stamp Set – Item #127793 (c), #128655 (w)
Delightful Dozen Stamp Set – Item #122652 (c), 128547 (w)
Early Espresso Classic Stampin’ Pad – Item #126974
Soft Sky Classic Stampin’ Pad (new color, available May 31st)- Item #131181
Scallop Oval – Item #119856
Ovals Collection Framelits – Item #129381
Honeycomb Embossing Folder – Item #129378
Linen Thread, Natural – Item #104199
Sponge Daubers – Item #102892
Blender Pen – Item #102845
Stampin’ Dimensionals – Item #104430
Big Shot Die-Cutting Machine – Item #113439
SNAIL Adhesive – Item #104332
Sticky Strip – Item #104294
My break is over and I’m off to join in on the crafting!
Thanks for stopping by and be sure to check back again as I plan to share the items we’re crafting!
Until then, have a great week!


 or
or


