Feb 4, 2014 | Uncategorized |
Last week was a “wild weather” week in Georgia…62 on Monday, snow and ice on Tuesday! This week the temperatures are milder with rain. Yesterday while out and about, I actually saw the first signs of Spring…daffodils! Seeing the yellow blooms brought a smile and hopes that it’s a sign that Winter will soon be exiting. With news of multiple snowstorms crossing the U.S. this week, I am sure many of you are wishing for Spring to arrive too!
The daffodils reminded me of a birthday card made for a friend using the Flower Shop Stamps and Secret Garden Framelits Set from Stampin’ Up! It’s being shared today in hopes that it will brighten your day too!
 |
| Birthday Card using Stampin’ Up! Flower Shop Stamp & Secret Garden Framelit Sets |
Materials:
Coastal Cabana Card Stock
Whisper White Card Stock
Old Olive Card Stock
2013-2015 Designer Series Paper Stack (Coastal Cabana)
Flower Shop Stamp Set
Secret Garden Framelits
Best of Birthdays Stamp Set
Coastal Cabana Classic Stampin’ Pad
VersaMark Pad
White Embossing Powder
Stylish Stripes Textured Impressions Embossing Folder
Extra-Large Oval Punch
Dazzling Details
Rhinestone Basic Jewels
Stampin’ Dimensionals
Notes: Dazzling Details was added to the birthday greeting using a small paint brush to add a bit of glitter to the greeting. The Coastal Cabana flower was heat embossed using the White embossing while the Whisper White flowers were stamped using the Coastal Cabana Classic Stampin’ Pad. Use the dimensionals to “pop” the center flower and the greeting.
Thanks for stopping by!
If you have any questions or need products for creating your own projects,
Don’t forget to “Follow Me” or sign up for email updates
so you’ll receive my next post.
Have a good week!
Jan 27, 2014 | Uncategorized |
Finally, I am getting back to my blog! Technology issues have been challenging the past 6 weeks. As noted, I thought my computer had been repaired but such was not the case. It completely crashed upon the first attempt to use it at home. Now I have an new computer with a new operating system that has altered how some of my programs work…they just don’t seem the same. Trying to become a fan of Windows 8! Looking on the positive side – it keeps the brain challenged!
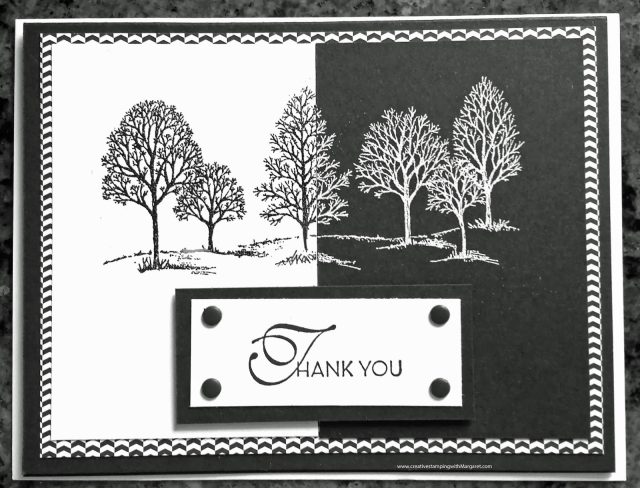
On to projects…the monthly card class was held this week and the focus was making thank you cards using the”Split Negative” technique. Below are samples of cards made in the class.
 |
| Split Negative Technique using Stampin’ Up! “Lovely as a Tree” Stamp Set |
Materials:
Lovely as a Tree Stamp Set
Lacy & Lovely Stamp Set
Early Espresso and Whisper White Card Stocks
Early Espresso Designer Series Paper
VersaMark Ink
Early Espresso and Whisper White Stampin’ Emboss Powder
Early Espresso Candy Dots
 |
| Split Negative Technique using Stampin’ Up! “World Treasures” Stamp Set | | | |
Materials:
World Treasures Stamp Set
Another Thank You Photopolymer Stamp Set
Pool Party, Basic Black & Whisper White Card Stock
Retro Fresh Designer Series Paper
VersaMark Ink
Pool Party and Whisper White Stampin’ Emboss Powder
Scalloped Oval Punch
Large Oval Punch
Pool Party Taffeta Ribbon (retired)
Though Christmas has passed, I wanted to share a couple photos of package decorations that were made to use instead of bows. The recipients were wowed! The “Bags & Tags” class also learned to make these. Credit for the idea comes from Stampin’ Up! demonstrator, Tami White. She created a “Joyful Tidings” tag and the instructions were received from her. Since my packaging consisted of more traditional colors, I altered the concept and created the “Merry Christmas” tag decoration.
Thanks
for stopping by…and don’t forget, if you have questions on any of the projects or products used, contact me at
[email protected].
Be sure to check back later this week…until then,
have a great week!
Jan 6, 2014 | Uncategorized |
Hi all! Just a quick update to let you know that I’ve not forgotten my blog. It’s been a month since my last post and my intentions to post a couple holiday items were cut short as my computer crashed. It took 3 1/2 weeks to get it repaired but the good news is that most of my information was retrieved. Lesson learned – purchase an automatic backup system!
Hope that you had a great holiday season…mine was wonderful. I am trying to catch-up and will be posting the photos of some of the holiday projects (better late than never) and sharing some new ones soon.
Check back later this week as I get back on track and thank you for your patience!
Dec 5, 2013 | Uncategorized |
Hi all! Whew…what a busy past few weeks. I can’t believe it’s almost been a month since my last post. As you’ve guessed, I’ve been quite busy and my blog has been neglected. The craft fair that I participated in was a huge success and as promised, I’m sharing photos of items that were made for the sale. My sister assisted and we had two tables of a variety items including paper crafts, cards, homemade body products (soaps, body butters, lip balms, lotion bars), embellished towels and baked goods. The list was long!
Table 1
Table 2
Note Pads – mini legal pads were cut to form pads and covered with various Designer Series Papers – some current and some retired. The covers were also embellished and different sayings were printed to finish the note pads. These were popular!
Santas made from the retired Petal Cone Bigz L Die from Stampin’ Up! These were the most popular item of the day and quickly sold out. I received an order to make them for an upcoming event so am busy making more of them. I’ll be sure to take a photo of one individually to post in the future. Though the die is officially retired by Stampin’ Up!, it is still available in the Clearance section.
Click here to order your Petal Cone Bigz L Die. The die is very versatile and I plan to share other projects using the die. Kay Sha at Creations on Paper has general directions for making the Santa using the Petal Cone Die and I made a few adjustments on the embellishments.
Mini-Legal Pads with Matching Pen
These also were a big success. They make great hostess gifts during the holidays.
There are still a couple of photos that I’ll share on my next post. Be sure to sign up to follow my blog so you will receive notice of the next post! Until then, have a great week.
Nov 8, 2013 | Uncategorized |
Hi everyone! Hope all’s well. It’s been busy around my house preparing for an upcoming craft fair but it’s been fun too. The house is a “creative mess”! I’ll be sharing some of the projects with you in the weeks ahead so stay tuned. Today’s share is a card sample from last month’s “Flips and Folds” class. This card is a nice change from normal folds and simple to make.
 |
| Fancy Fold Thank You Card |
Materials:
Crushed Curry Card Stock
Coastal Cabana Card Stock
Whisper White Card Stock
Eastern Elegance Designer Series Paper
Coastal Cabana Classic Stampin’ Pad
Crushed Curry Classic Stampin’ Pad
Window Frames Collection Framelits
Blossom Punch
7/8″ Scallop Circle Punch
Mixed Bunch Stamp Set
Regarding Dahlias Stamp Set
Rhinestone Basic Jewels
To make the card base, start with a piece of 8″ x 4 1/4″ card stock and score at 4″ on the landscape side to create a card size of 4″ x 4 1/4″. Decorate base with designer series paper or as desired. Use the largest Window Frames framelit to cut a piece card stock and attach the window frame to card base. Be sure to position the piece with half of it above and half of it below the card’s fold. This should be a standard 5 1/2″ x 4 1/4″ card size. NOTE: Apply adhesive only on part of the window frame piece that is below the fold. Otherwise there will be adhesive showing on the back of your card. Decorate and embellish as desired.
Hope you get a chance to make a Fancy Fold card! If so, please share your design with me!!!
Have a great week!
Thanks for stopping by…and don’t forget, if you have any questions or wish to purchase any of the products used for this project, contact me at
[email protected].
Oct 29, 2013 | Uncategorized |
Finally! A new post!!! It’s been busy around my house the past couple of weeks and I’m finally getting back on track to post some projects. Last Friday, a neighbor organized the annual Halloween Golf Tournament for a group of ten couples. We dressed in costumes, played a 9 hole golf tournament and enjoyed dinner together. It was a blast! Playing golf in costume was not the easiest thing to do but it wasn’t exactly serious golf, as wine was served prior to teeing off. My task was to provide treats for the group and I decided to make Treat Bags based upon Julie Brewer’s design from the Inky Fingers Club. It was an easy and fairly quick project to complete.


Various designs from the Witches’ Brew Designer Series Paper was used to cut the flag pennants. Elegant Eggplant and Pumpkin Pie card stocks were used to cut the Chalk Talk Framelits tag. The tags were then texture embossed with the Houndstooth Embossing folder. Assorted Halloween themed sayings (current and retired) were used to add a Halloween sentiment. The clothespins for closing the cello bags was covered with Witches’ Brew Designer Washi Tape.
Many thanks to Julie for this project idea! Be sure to check out Inky Fingers Club.
Thank you for stopping by.
If you have any questions or wish to purchase products for your projects, you can contact me at
[email protected]
Have a great week.


