Apr 27, 2018 | Gift Bags, Mini-Treat Bag Thinlits |
I was excited to have been selected to participate at OnStage as a display board sample maker and it was a lot of fun to receive a box of upcoming products from Stampin’ Up! to use for making the samples. Of course, it required that I not share the products or show finished projects until after the meeting and now I am able to start sharing the projects with you. One of the new products received was the Garden Impressions Designer Series Paper package – this 6″x 6″ package of paper containing 4 each of 12 double-sided designs is gorgeous and I used it for making most of my projects. The first project being highlighted is a Mini Treat Bag made with one of the papers from the package. My box of new products also contained the Blossoms Elements embellishments and the Petal Pink Metallic Ribbon so they were used on this project also. A Delicate White Doily was wrapped around one edge of the mini treat bag and held in place with the Powder Pink Cardstock belly band. After wrapping the ribbon around the band, the Sweet Cake Framelits Dies were used to cut the Tranquil Tide Cardstock and Gold Foil creating a backdrop for the flower embellishments. The tag was cut using the Bouquet Bunch Framelits and stamped using the coordinating Beautiful Bouquet Stamp Set.

It is important to note that while you are not able to order the Garden Impressions Designer Series Paper, the Blossom Element embellishments and Petal Pink Metallic Ribbon until June, the other supplies are available now. But don’t delay ordering the Mini Treat Bag Thinlits (item #137547) and the Delicate White Doilies (item #141701) – they are retiring on May 31 and are available while quantities last. To order your supplies click here.
Thanks for stopping by! Check back again in a few days to see more OnStage Display Samples. Happy Stamping! 
Jan 2, 2018 | Gift Bags, Mini-Treat Bag Thinlits |
Happy New Year! Hope that you enjoyed the holidays and that 2018 is off to a good start. We had a wonderful holiday with both sons and their families arriving on Christmas Eve for the night. It was lots of fun watching Alex, who is 8, teach Brooklynn (9 months) the tricks to unwrapping gifts. Naturally, she was more interested in pulling the wrapping paper out of the trash bag! Oh, what fun!
The world celebrates the New Year and Stampin’ Up! kicks off Sale-A-Bration starting tomorrow so I decided to share a mini-treat bag that can be used for all sorts of celebrations. The Birthday Memories Designer Series Paper (DSP) was used for constructing the bag. The Birthday Friends Framelits Dies made decorating the bag quick and easy using the DSP! The “Let’s Celebrate” sentiment is from the Birthday Delivery Stamp Set and a mask was used when stamping to block the “your day!” on the stamp. The Birthday Delivery Bundle includes all of these items offering a 10% savings. I finished off the bag by scattering a few rhinestones on the bag.
 |
| Treat Bag using Stampin’ Up! Birthday Delivery Bundle and Mini-Treat Bag Thinlits |
Thanks for stopping by and be sure to check back this week for Sale-a-bration details. The new Occasions catalog also goes “live” tomorrow, January 3!
Project Materials:
Dec 14, 2017 | Craft Fair Projects, Gift Bag Punch Board, Gift Bags |
As promised, here is craft fair project # 3. It’s Foil Frenzy Specialty Designer Series Paper (DSP) meets Gift Bag Punch Board!
I decided to purchase some of the Bath and Body Kitchen Liquid Hand Soaps and make gift bags to package them as “Grab and Go” gifts. The packages are great for Hostess gifts to have available when needed. A tag was added with extra gold cord so that it could be removed, signed on the back and easily replaced on gift with shortened cord closer to the ribbon tie closure. A handheld punch was used to punch a small hole in the top of the tag but you could just use Stampin’ Dimensionals to attach the tag under the ribbon bow, if desired. With the Foil Frenzy DSP, the gifts are appropriate to use not just for the holidays but for any occasion.
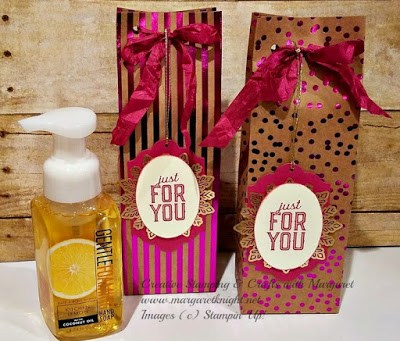 |
| Large Gift Bag for Bath & Body Works Liquid Soap using Stampin’ Up! Foil Frenzy Specialty Designer Series Paper and the Gift Bag Punch Board |
To make the bag, cut one inch from one side of the DSP so the piece will measure 11″ x 12″. Follow directions for using Gift Bag Punch Board to make a large bag. The 11″ side is the height of the finished bag. Note: it requires more force to punch the Foil Frenzy DSP and the dotted DSP pages seemed easier to punch than the striped DSP pages so don’t be alarmed that if it requires your brute force! It’s worth it as the bags are beautiful.
Tags were cut using the Lots of Label Framelit Dies and the Layering Oval Framelits. The sentiment from Merry Little Labels was stamped in coordinating ink (in the samples shown, Berry Burst Classic Stampin’ Pad was used). The stamped oval was layered on a Foil Snowflake prior to attaching to the large label.
Thanks for stopping by! Check back tomorrow for the next project.

Project Materials:
Sep 24, 2017 | Gift Bags, Halloween |
I must admit that I am not a cat person but when I saw the cat punch in the Stampin’ Up! Holiday catalog, I knew it had to go onto my must have list. Since several friends have cats, the punch will get lots of use. What is great is that the punch coordinates not only with the Spooky Cat stamp set but also the Spooky Night Designer Series Paper (DSP). For the treat bag below, I used the cat punch to cut the black cat from the DSP. The witches hat was fussy cut for the DSP also. The cutting instructions for the treat bag are from Angie Juda.
 |
| Halloween Treat Bag using Stampin’ Up! Spooky Cat Stamps Set, Spooky Night DSP & Cat Punch |
Thanks for stopping by and check back soon to see another project.
As always, contact me if you have questions or would like to order products for creating projects yourself!
Just a reminder…when you place a $300 order or more order in September or October, 2017, you will earn the limited edition stamp set,
Merry Patterns. This is also in addition to the Stampin’ Rewards you will earn with your order. Please contact me for more details.
Enjoy your week!
#spookycat, #halloweentreat
Project Materials:


