Mar 17, 2021 | Cards, Dandy Garden, Dandy Garden, Designer Series Paper, January-June 2021 Mini Catalog, Product Suites, Uncategorized |
This past Monday, a virtual event for the Playtime with Paper team took place. The event focus was a mystery stamping project. Prior to the event, a posting provided a list of materials including the dimensions for creating a card. Participants then select the colors, designer series paper, stamp set and so forth they wish to use. No one knows what the final card layout will be so that’s the “mystery” and it’s fun to see the various card creations afterwards.
For my mystery stamping presentation, I choose to use different elements from the Dandy Garden Suite. I knew that I wanted to incorporate a couple of bumblebees on the card. Since the Dandy Garden Designer Series Paper includes a bumblebee print, it became the inspiration for the main color scheme of Misty Moonlight. Even better is the Dandy Wishes Dies bumblebee die coordinates with the bumblebee printed designer series paper. The card turned out even better than I envisioned!

Additional Card Details:
First, select two coordinating pieces of the Dandy Garden Designer Series Paper. The stripe and the dandelion print coordinate perfectly. For the card base and the texture embossed layer, use Misty Moonlight cardstock. The Dandelions 3-D Embossing Folder ties in perfectly with the dandelion print. Don’t you agree? To complete the card, add the sentiment label, the bumblebees, and rhinestone jewels. The sentiment comes from the Dragonfly Garden Stamp Set. Finish by wrapping the card front and tying a bow using the Silver Metallic-Edge Ribbon. Under Project Materials, the specific materials for the project are listed. Also added is the link for ordering the entire Dandy Garden Suite – then you’ll have lots of creative options!
It was fun hosting the mystery stamping for the Playtime with Paper team. Afterwards, participants posted their cards to the team’s Facebook page. Everyone’s cards were beautiful and I don’t think anyone selected the same Designer Series Paper or same stamp set. And importantly, a huge thank you to Ange McKay for sharing the dimensions for the mystery stamping.
Here are a few additional samples using the same layout…
This card features products from the Whale Of A Time Suite.

Another card featuring products from the Dandy Garden Suite.

JUST A REMINDER…

The April 2021 Paper Pumpkin kit subscription period is now available. This vivid, summer-inspired kit includes two full sticker sheets and all supplies needed to make 12 fun-shaped cards with matching envelopes. But, even more cool: it’s the first Paper Pumpkin kit designed with kids in mind!
Details
- Kit includes enough supplies to make 12 fresh, fun-shaped cards—6 popsicles and 6 blank semicircles to color—and coordinating envelopes. Kit includes card bases, 2 full sticker sheets, decorative die-cut pieces, embellishments, and more.
- Envelope size: 4-1/2″ x 5-3/4″
- Coordinating colors: Blackberry Bliss, Bermuda Bay, Bumblebee, Cinnamon Cider, Old Olive, Terracotta Tile
- Coordinates with the Ice Cream Corner Suite from our January–June 2021 Mini Catalog.
The So Cool Paper Pumpkin kit is available through April 10, 2021 but note supplies may become limited near the end of the subscription period.
To subscribe, click here.
Margaret’s Customer Loyalty Program: Download the form (2020-2021 Customer Loyalty Form) for program details and start tracking your orders. Plus for orders over $150, you’ll also receive rewards from Stampin’ Up! Thank you for placing your order with me. You can order by clicking this link: Margaret’s Online Store. I sincerely appreciate your orders.
Thanks for stopping by and happy crafting!

Project Materials:
The host code for March is: AS74UVX2. Please use this code if your order is $150 or less (before shipping & taxes). Remember, if your order is over $150, you will receive the host rewards.
Jul 17, 2020 | 2020-2021 Annual Catalog, Cards, Designer Series Paper, Flowers for Every Season, Thinking of You |
Do you find yourself challenged creating design interest on cards? Today’s card may just help. Using a variety of techniques, design interest is being created on the card. First, notice the Daffodil Delight card base. By stamping color on color, it creates design interest. Then, the Misty Moonlight cardstock layer is askew on the card base. In addition, the Misty Moonlight cardstock is texture embossed. Next, a piece of designer series paper is cut into a circle and topped with a sentiment banner piece. That’s a total of five shapes and techniques for creating design interest. While it took me some time to adapt to adding cardstock askew on card fronts, I must admit it does add visual interest and is a nice change from typical card layering techniques. 
Card Details:
- Create the card base using a 4-1/4″ x 11″ piece of Daffodil Delight cardstock. Score at 5-1/2″ and fold.
- Using Daffodil Delight Classic Stampin’ Pad, stamp the small flowers on the card base front. The flowers are from the Field of Flowers Stamp Set.
- Next, cut a piece of Misty Moonlight cardstock 3-3/4″ x 5″. Texture emboss using the Tasteful Textile 3D Embossing Folder (this is becoming a favorite of mine!).
- Then, add the Misty Moonlight embossed layer to the card front placing it askew. After adhering, trim the overhanging cardstock edges.
- With the Layering Circles Dies, cut a coordinating floral print from the Flowers for Every Season 6″ x 6″ Designer Series Paper. Add to the Misty Moonlight cardstock layer. TIP: if you own the retired 2-1/2″ circle punch, use it in lieu of the 2-1/2″ layering circles die especially if you’re short on time!
- On a 3/4″ strip of Whisper White cardstock, use the Banner Punch to create a banner tail on the right side of the strip. Next, stamp the sentiment using Misty Moonlight Classic Stampin’ Pad. The sentiment is found in the Lovely You stamp set. With Stampin’ Dimensionals, add the banner strip to the card front and across the designer series paper circle. If cardstock overhangs on the left side, trim the cardstock so that it’s even with the side of the card.
- To finish the card, add a knotted bow to the side of the sentiment. The knotted bow uses the Daffodil Delight 1/4″ Ruched Ribbon.
Now, it’s your turn to start creating visual interest! Share in the comments section other ideas.
Reminders:
The July 3D Tutorial Bundle is available!

Would you like the July 3D Tutorial Bundle?
You have several ways of receiving the July 3D Tutorial Bundle:
1. Order $50 (before taxes and shipping) from my online store between now and July 31, 2020 and you’ll get the PDF for FREE. Note: be sure to register and allow me to contact you so I receive notice of your order and can send the tutorial.
2. Purchase the July 3D Tutorial Bundle PDF (a total of 6 tutorials) for $15.00. This is a one-time purchase. Simply drop me an email at creativestampingwithMargaret@gmail.com and I will send you a PayPal Invoice. Upon receipt of payment, I will send you the tutorial bundle.
3. Join my Playtime with Paper team! Team members always receive the tutorials for FREE!
Also, Stampin’ Up! is making it even better to order this month…check out the Bonus Days info below.

Thanks for stopping by! Happy crafting…

Project Materials:
Jun 1, 2020 | 2020-2021 Annual Catalog, 3D, Bundles, Celebrate Sunflowers, Flowers for Every Season, In Colors, New Colors, Product Suites, Stampin' Blends, Tutorials, Uncategorized |

It’s a new month and to kick it off, we have the June 3D Tutorial Bundle! We have the fabulous Tammy Civello joining us as a guest designer for this month’s 3D tutorial. In addition to the tutorial bundle, the team is featuring a blog hop! Even better, we’re each sharing a second project created using the same products to coordinate with our tutorial project. This month, the team is featuring products from the Flowers for Every Season Suite for our projects. This suite of products is in the upcoming 2020-2021 Annual Catalog and will be available for purchase on June 3.
Remember, the projects designed for the 3D tutorial bundle aren’t available elsewhere online. Therefore, you’ll receive EXCLUSIVE projects in the tutorial bundle. In addition, both Imperial and Metric measurements are included for each project.
Now for a Sneak Peek of the June 3D projects…

Here’s my bonus project to coordinate with my June 3D tutorial. It features the Celebrate Sunflowers Bundle which is included in the Flowers for Every Season Suite. Also, check out the new In-Color, Misty Moonlight.

Card Details:
- Using a 4-1/4″ x 11″ piece of Misty Moonlight cardstock, score at 5-1/2″ and fold to create the card base.
- A layer of 4-1/8″ x 5-3/8″ piece of the Misty Moonlight In Color 6″ x 6″ Designer Series.
- With the large sunflower stamp from the Celebrate Sunflowers Stamp Set, stamp the image onto a 3-1/2″ x 3-1/2″ piece of Whisper White cardstock using Soft Suede Classic Stampin’ Pad. Color the sunflower image using the following Stampin’ Blends Markers: Light Soft Suede (flower center), Light So Saffron, Light Pumpkin Pie and Dark Daffodil Delight (flower petals). Cut using the coordinating die from the Sunflowers Dies.
- On a 4-1/2″ x 3-1/2″ piece of Whisper White cardstock, stamp the sentiment on the lower right side of the cardstock using the Misty Moonlight Classic Ink Pad (Item #153118). Lucky for me, an ink spot of this color is in the May Paper Pumpkin kit!
- Stamp three (3) of the large leaves from the Celebrate Sunflowers stamp set onto the Whisper White cardstock using Old Olive Classic Stampin’ Pad. TIP: for determining placement of the leaves, lay the die cut sunflower onto the cardstock to give you an idea where to stamp the leaves. Remove the sunflower and then stamp the leaves. Color the leaves using the Light Old Olive Stampin’ Blends Marker. Next adhere to the card offset by aligning the Whisper White edge with the right edge of the Designer Series Paper layer.
- Attach the die cut sunflower to the card using Stampin’ Dimensionals.
- Embellish by adding the Misty Moonlight Enamel Dots (from the 2020-2022 In Color Enamel Dots package).
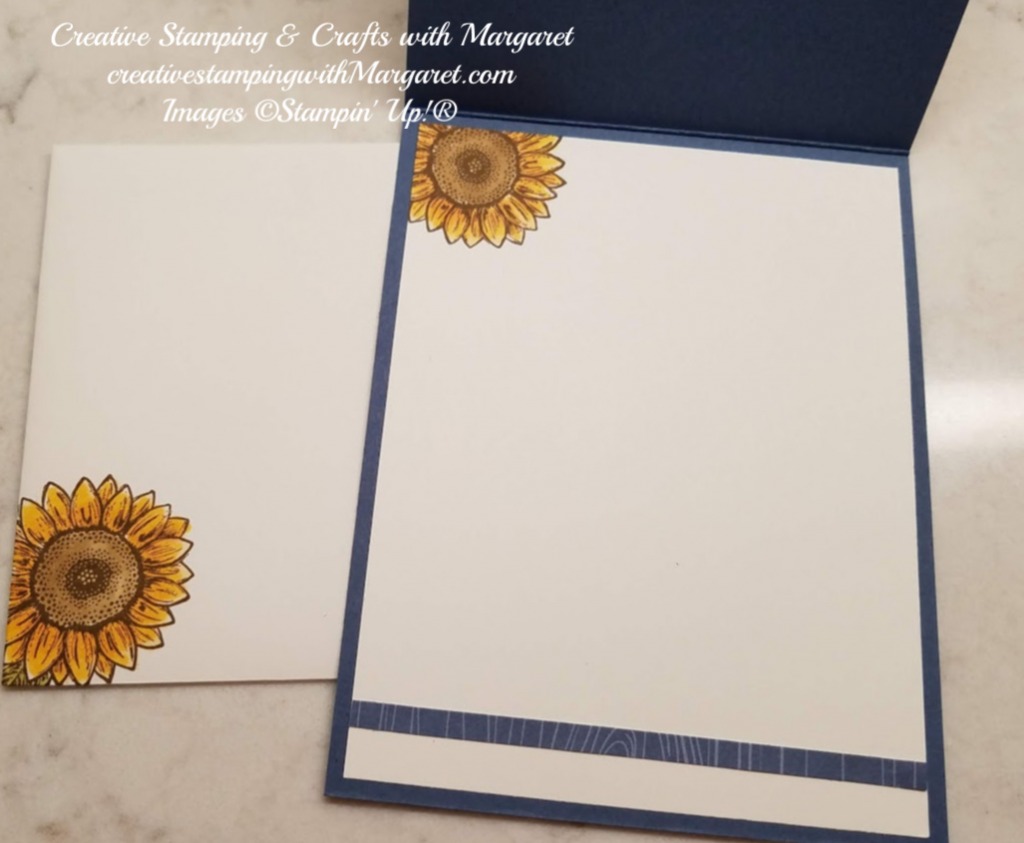
One more thing – embellish the card interior and the envelope!

For easy ordering, check out all the products in the Flowers for Every Season Suite (Item #154132). The suite offers lots of products for creating a variety of floral themed cards and projects. Remember, the new in color and suite items can be ordered beginning on June 3, 2020.
Would you like the Tutorial Bundle?
You have several ways of receiving the 3D Tutorial Bundle:
1. Order $50 (before taxes and shipping) from my online store between now and June 30, 2020 and you’ll get the PDF for FREE. Note: be sure to register and allow me to contact you so I receive notice of your order and can send the tutorial.
2. Purchase the June 3D Tutorial Bundle PDF (a total of 6 tutorials) for $15.00. This is a one-time purchase. Simply drop me an email at creativestampingwithMargaret@gmail.com and I will send you a PayPal Invoice. Upon receipt of payment, I will send you the tutorial bundle.
3. Join my Playtime with Paper team! Team members always receive the tutorials for FREE!
You can place your product orders directly via my online store. Or, you can also order via the links under Project Materials (either the bundle or individual components).
Thank you for stopping by today and happy crafting!
Now to hop along:
- Gloria Plunkett at Designz By Gloria
- Cindee Wilkinson at Just Sponge It
- Kurstan Del Rosario at Stamp with Kurstan
- Margaret Knight at Creative Stamping with Margaret – you are here
- Laurie Bradshaw at Craft Coach Laurie
- Tammy Civello at Cards by TLC
Project Materials: (click on link to order)
The Host Code for June is K3A9P6XS. Please use Host Code only if your order is less than $150. If your order exceeds $150, you will receive the host rewards! Prior to completing your order, you will have the opportunity to enter the code into the blank space labeled Host Code. Thank you!