Sep 8, 2015 | Uncategorized |
Hope you had an enjoyable weekend and were able to celebrate Labor Day with fun activities. We had picture perfect weather and were able to spend lots of time outdoors.
Following up on my promise to not overwhelm you with Christmas yet, I decided to try out the new Square Pillow Box Thinlits Dies. Oh, what fun! I kept my first project using the set very simple and made a window pillow box using Into the Woods Designer Series Paper (DSP). The window die is included with the dies set so it couldn’t be simpler. To embellish the pillow box, a leftover leaf and acorn from the Witching Decor Project Kit were used (just telling you, that kit has tons of stuff in it!). The acorn with the sentiment “Nuts About You” is from the Acorny Thank You stamp set and was stamped using Soft Suede Classic Stampin’ Pad onto Whisper White card stock then punched with the Acorn Builder Punch. An acorn topper from the same set was used on the acorn from the project kit and the oak leaf was stamped using the Lighthearted Leaves stamp set. Edges were sponged to add more dimension. The Into the Woods 3/8″ Cotton Ribbon was tied around the pillow box prior to adding the paper embellishments…love the cotton ribbon but not sure about this color with my leaf, perhaps Early Espresso or Pumpkin Pie 1/4″ cotton ribbon would have matched better but I used what I had available. I’m sure many of you have been in the same situation…thought you had a particular item on hand, only to find out you forgot to order it!
 |
| Treat Holder using Stampin’ Up! Square Pillow Box Dies Set & Into the Woods Designer Series Paper |
There are endless ways to use this Square Pillow Box Die set and I look forward to sharing some different projects using the die in the near future. This particular project comes together quickly so I see many pillow box treat holders being used with the upcoming holidays.
Check back on Friday to see what else I’ve been up to!
Thanks for stopping by…
Sep 5, 2015 | Uncategorized |
For the past couple of days, I’ve been preparing samples for this month’s Christmas Stamp-a-Stack so I decided to share a few of the cards with you. Yes, I know we’re still a few months from Christmas but I thought it would be nice to get a head start on preparing holiday cards. The new Holiday Catalog is filled with some of the most beautiful designer papers and stamp sets so I’ve gotten into the Christmas spirit early! The biggest problem is deciding which to use first. I have to share a funny incident from today…my husband looked to see what I was working on and said “no! I’m not ready for Christmas yet!” Well, I am!!!
One of my favorite designer series paper sets in the Holiday Catalog is the Home for Christmas Designer Series Paper (DSP). The vintage look of the paper brings back many childhood memories so I decided that one of the card sets would showcase the paper. The card with the “Merry Little Christmas” sentiment was crafted using a design for a gift tag that was a Make & Take from the Stampin’ Up! convention. When we made the tag, I knew that not only could it be used for a gift tag but it would make a wonderful card. I have to thank demonstrator Peggy Hovorka in our local Stampin’ Up! group for the “Ho Ho Ho” design. She shared it with the group and it fits the theme that I selected perfectly. Of course, the paper with the deer is cute so I had to use a deer in a design.
 |
| Vintage Themed Christmas Cards highlighting Stampin’ Up! Home for Christmas Designer Series Paper |
More Christmas cards are on my agenda but I promise not to ignore Fall & Halloween!
Some great projects are being planned highlighting the changing of the seasons.
Have a great Labor Day weekend! I’ll be sharing a new project on Tuesday.
Thanks for stopping by…
Materials:
Sep 1, 2015 | Uncategorized |
The other technique from last week’s class was the “baby wipe technique”. With this method, baby wipes are used as the stamp pad. Take a couple baby wipes, fold and use Classic Stampin’ Ink Refills to drop colors randomly onto the baby wipe. Use 3-4 colors, filling in area that is slightly larger than the stamp being used. The inked baby wipe pad can be used a couple of times for stamping. It really is a simple technique, yet, produces a beautiful effect.
The first card made used the oak tree from the Lovely As A Tree stamp set and the sentiment is from Endless Thanks. Since Fall is arriving soon, colors were selected to mimic the leaves displaying fall foliage. Also, don’t forget to stamp the interior – we used the oak leaves from the set to stamp an upper and lower corner.
 |
| Baby Wipe Technique using Stampin’ Up! Lovely as a Tree Stamp set, Into The Woods Designer Series Paper and Classic Stampin’ Ink Refills in Old Olive, Cajun Craze, Crushed Curry & Pumpkin Pie |
The other card used the By The Tide and Sassy Salutations stamp sets along with three coordinating blue refill colors to ink the baby wipe for use stamping the coral. Though it’s not evident in the card photo, Dazzling Details was used on the stamped fish. Even with a touch of glitter, this is a great card to send to a male.
 |
| Baby Wipe Technique using Stampin’ Up! By the Tide & Sassy Salutations stamp sets, Classic Stampin’ Ink Refills in Pool Party, Tempting Turquoise and Marina Mist | | | |
Both the Ombre’ and Baby Wipe techniques are fun, simple methods that can be used for creating a different, unique look on your cards. Hope these last posts have inspired you to try one or both of the techniques! If you have any questions on how to were create these cards or steps, don’t hesitate to contact me.
Have a great week and check back on Friday to see what’s new item that I’ll be sharing!
Thanks for stopping by…
Materials & Tools:
Aug 29, 2015 | Uncategorized |
This week in class the focus was on using two different techniques in making cards. The first that I’ll share is the Ombre’ technique. There are a variety of methods for creating the graduated color going from dark to light on cards and we used two: the brayer method and the sponge method. The brayer is an excellent tool for using with the Ombre’ technique. With the brayer, just one color of ink was used and applied rolling the
brayer back and forth across the entire card piece to achieve the
desired look. Just remember that when using the brayer to apply your ink, start off the edge of the card stock and roll across the page. If you start directly on the card, a dark line can be formed. By continuously rolling the brayer across the page, the ink will be applied from dark to light on the card stock as the amount of ink on the brayer decreases across the page. With the sponge method, three coordinating colors (light to dark) were used and sponged onto shimmery white card stock, slightly overlapping each color with the sponge.
 |
| Ombre’ Brayer Technique using Stampin’ Up! Cucumber Crush Classic Stampin’ Pad & Another Thank You stamp set |
 |
| Ombre’ Sponge Technique using Stampin’ Classic Pads So Saffron, Crushed Curry & Hello Honey; Stamp Sets – Thoughts & Prayers and Wetlands |
Hope these samples will inspire you to use your brayer or sponges and have fun! All materials and tools used at listed below.
The other technique from class will be shared on Tuesday, so be sure to check in next week.
Have a great weekend!
Thanks for stopping by…

Materials & Tools:
Aug 25, 2015 | Uncategorized |
In today’s post, I’m thrilled to share the project kit, Witching Decor, that is in the Holiday Catalog. It was a blast to assemble and it’s super cute! It took approximately 2 hours to complete and depending upon how many of the leaves you wish to use it could take less time (of course, the television was on and I occasionally had to glance at it!)…I used roughly 1/3 of the leaves and stamped, crumpled and sponged them to add depth of color. The Witches’ Night stamp set coordinates with the kit. It is a very generous project kit with many extra pieces for additional projects. With some of the leftover pieces, I made a Halloween card and another card using some of the extra leaves.
 |
| Stampin’ Up! Witching Decor Project Kit and Halloween Card with coordinating Witches’ Night Stamp Set |
 |
| Stampin’ Up! Witching Decor Project Kit Leaves and Lighthearted Leaves Stamp Set |
Be sure to put the Witching Decor Project Kit on your “must have” list
so you can order it when it becomes available on September 1!
The next craft project being shared is a Piggy Bank that was decorated with vinyl cut using the Silhouette Cameo. It was an engagement gift for my son & his fiance so they could save for their upcoming wedding. Hope they’ve been saving…the date is quickly approaching!
 |
| who knew you had to have a wedding tag line?! |
Cards from the monthly class will be posted later this week, so be sure to check in.
Thanks for stopping by…
Aug 21, 2015 | Uncategorized |
Behind again and playing catch-up! Had a wonderful time last week with friends visiting thus the delay. As promised in my last post, I am sharing a few of my favorite cards from convention swaps.
The first card is from the Black & White with Additional Color Swap and was received from Sharon McCanless. The card is just adorable and a perfect card to “welcome baby”. The Something for Baby stamp set and Everyday Chic Designer Series Paper was used. Watermelon Wonder Classic Stampin’ Pad was used to stamp the onesie and it pops against the black card stock.
 |
| “Something for Baby” Stamp Set from Stampin’ Up! Everyday Chic Designer Series Paper, Black & White Card with Watermelon Wonder |
The next card was from the Fresh Market Swap and is gorgeous! Unfortunately, the creator did not provide their name but they did a beautiful job on this fancy fold card. The Market Fresh stamp set was used to heat emboss the bunch of grapes with black embossing powder prior to coloring the grapes and leaves. Farmers Market Designer Series Paper, Mossy Meadow card stock, 5/8″ striped cotton ribbon (cut in 1/2) and 1/4″ cotton ribbon were also used on this special card.
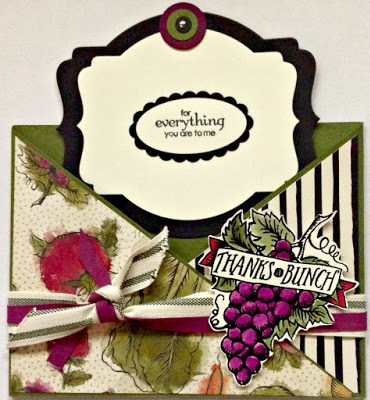 |
| Stampin’ Up! “Market Fresh” stamp set & Farmers Market Designer Series Paper |
From the Gift Card Swap, this creative gift card holder was received. Again, the creator did not include their name to receive credit for their creativity. Bohemian Designer Series Paper, Blackberry Bliss card stock and Fabulous Four set was used to make this package shaped gift card holder. The front flap of the package top opens to reveal the gift card holder slot. The flap is held in place with small velcro tabs.
 |
| Gift Card using Stampin’ Up! Bohemian Designer Series Paper and Fabulous Four stamp set |
Hope you enjoyed seeing a few of the cards received. It was fun to participate in the swaps and I have many cards that will provide lots of inspiration. You’ll definitely see these designs in the future on my blog!
Be sure to check back on Tuesday to see a creation from the Holiday mini catalog (you’ll be able to place orders from it on September 1) and I’ll also be sharing a Silhouette project.
Thanks for stopping by…


