Jun 21, 2017 | Uncategorized |
Another of the cards from class using the Eastern Beauty stamp set is this quick and easy card. To create the base, one stamp was used to randomly stamp the repeated design on the upper two-thirds of the thick Vanilla cardstock and a beautiful gold striped piece of Eastern Palace Designer Series Paper was added on the lower card portion. A design strip from the Eastern Gold Vinyl Stickers was trimmed to fit the card and added the perfect extra touch. Layering the sentiment onto the gold glimmer paper finished the quick, easy and elegant card.
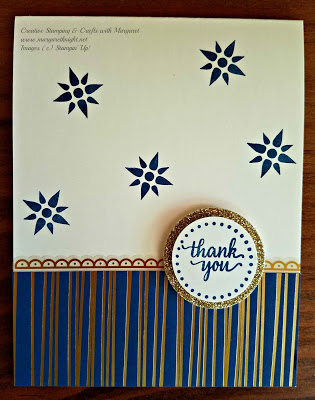 |
| Quick & Easy using Stampin’ Up! Eastern Beauty Stamp Set & Eastern Palace Specialty DSP |
Thank you for stopping by! Check back soon for more project ideas.
Project Materials:
May 30, 2017 | Uncategorized |
In this month’s card class, the Eastern Palace Suite Bundle was the theme. I admit that when the set became available for early order, it did not thrill me but after seeing some of the projects created, I decided to purchase the bundle and am so glad that I did! The combinations made using the Eastern Medallions Thinlits Dies and the Eastern Beauty stamps is almost endless. The Eastern Palace Designer Series Paper coordinates beautifully and features the new In-color Lemon-LIme Twist.
 |
Eastern Palace Suite Bundle from Stampin’ Up!
Currently there are two specials featuring The Eastern Palace Suite Bundle including FREE product! Take note: The specials are only available for two more days (through Wednesday, May 31) – the Eastern Palace Starter Bundle and the Eastern Palace Premier Bundle. You can order via the links in Project Materials listed below. The new catalog ordering begins on June 1 and the products will be available but not the starter or premier bundles.
Thank you for stopping by! Check back soon for more project ideas. 
#easternpalace, #easternbeauty, #enjoytodaycard
|
May 20, 2017 | Uncategorized |
Recently a younger cousin passed away unexpectedly and after the initial shock, I wanted to make a special card for my wonderful aunt. As I searched through my stamps to find the perfect sentiment, it became obvious that the Isaiah verse in the Rose Wonder stamp set from Stampin’ Up! was the one. The remainder of the card design utilizes the Botanical Builder Framelits Dies to create a serene but beautiful card. For the flower centers, I had some leftover candy dots but you can easily create your own centers by using a black sharpie to color Basic Pearls.
 |
| The Perfect Sympathy Card using Stampin’ Up! Rose Wonder Stamp Set & Botanical Builder Framelits Dies |
Please note: Botanical Builder Framelits Dies & matching stamp set – Botanical Blooms is retiring and is only available through May 31, 2017 or while supplies last. Click the link in Project Materials to order a set before they are no longer available. Best of all, both items are on sale (discounted pricing will appear when you link to the online store).
Thanks for stopping by and be sure to check back for more project ideas!
#rosewonder, #botanicalbuilderframelits, #Stampinupsympathycard
Project Materials:
May 14, 2017 | Uncategorized |
Happy Mother’s Day to all the moms celebrating their special day! The card being shared is the one that I sent to my mother but the sentiment from Dragonfly Dreams is appropriate for a variety of special occasions. The Jar of Love stamp set bundle from Stampin’ Up! is fun for creating a colorful floral bouquet. Note: due to the intense color of Cucumber Crush and Watermelon Wonder inks, the stamps were inked and stamped onto a scrap of paper before stamping onto the cardstock. This gave the color hue that I preferred for the card.
 |
| Stampin’ Up! Jar of Love Bundle with sentiment from Dragonfly Dreams |
Thanks for stopping by and be sure to check back for more project ideas!
#stampinupjaroflove
Project Materials:
May 8, 2017 | Uncategorized |
In the last class featuring Dragonflies and Butterflies, we used a quick and easy technique for creating a colorful butterfly that coordinated with the card’s colors. To make your own “designer” paper that coordinates with your card, simply select three colors and use a variety of background stamps to randomly stamp on a piece of neutral cardstock. Using the medium butterfly die from the Butterflies Thinlets to cut the butterfly. The Classic Stampin’ Pad ink colors used for creating the butterfly on the card below are: Island Indigo, Cucumber Crush and Daffodil Delight. Background stamps from Timeless Textures, Gorgeous Grunge and Dragonfly Dreams were used but any background stamp can be used.
 |
| Colorful Butterfly greeting card using Stampin’ Up! Butterflies Thinlits Dies, Island Indigo, Cucumber Crush and Daffodil Delight Ink Colors |
The color combinations are endless and I find this technique very useful when I just do not seem to have the perfect paper for a project. Be sure to give it a try!
Thank you for stopping by and check back again for more project ideas!

Project Materials:
oops! forgot to note that the fern leaves stamp is from Butterfly Basics (Clear Mount #138816, Wood Mount #138813)
May 1, 2017 | Uncategorized |
The theme for the April card class was “Butterflies and Dragonflies”. One of the techniques used for a dragonfly card was the “faux stained glass” technique. The inspiration for the card and technique came from Dawn Griffith at
Dawn’s Stamping Thoughts. Not only did I like the technique but the color combination of Wisteria Wonder, So Saffron and Mint Macaron. The Dragonfly Dreams stamp set and detailed Dragonfly Thinlits dies coordinate wonderfully with the Awesomely Artistic stamp set and it’s dragonfly.
 |
| Faux Stained Glass Technique using Stampin’ Up! Detailed Dragonfly Thinlits Dies, Basic Black & Whisper White Cardstocks, Wisteria Wonder, So Saffron & Mint Macron Stampin’ Write Markers |
This was a fun technique enjoyed by class participants so be sure to check out Dawn’s video via the link. Be sure to add a dragonfly to your envelope too. With the many color combinations available using Stampin’ Up! products, you can create your own special stained glass dragonfly!
If you would like to purchase any of the products used for this project, visit my
online store.
Thank you for stopping by and check back again for more project ideas!
The next post will have a butterfly card and a different technique from the class.
#dragonfly, #stampinup,
Project Materials:


